Showing posts with label sewing. Show all posts

19 November 2014

Little bits of sewing


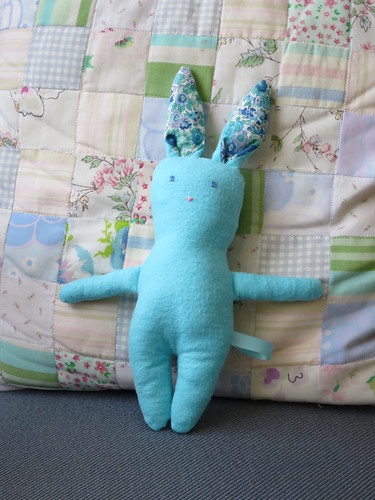
Elliott Bunny

I've done some small sewing projects of late. The most significant is a new bunny because we are expecting a new small person in the spring. The Wee Lass is super excited to be a big sister and helped stuff the arms and picked out the lining fabric for the ears (it's a Liberty print).


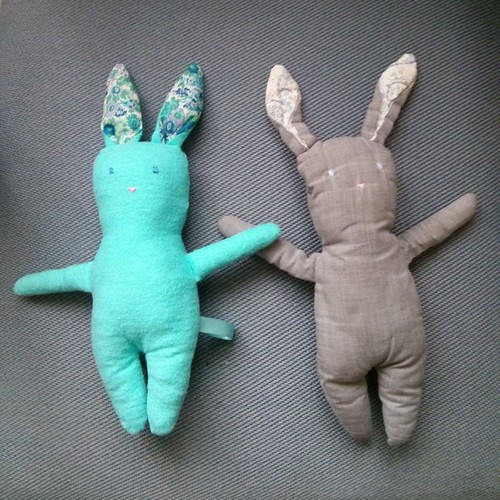
Elliott and Oscar

The new bunny is named Elliott, after the source of the body fabric, just like Oscar. Here they are together, Oscar looking very well-loved (and oft-laundered) compared to Elliott, who is patiently waiting for his little person.


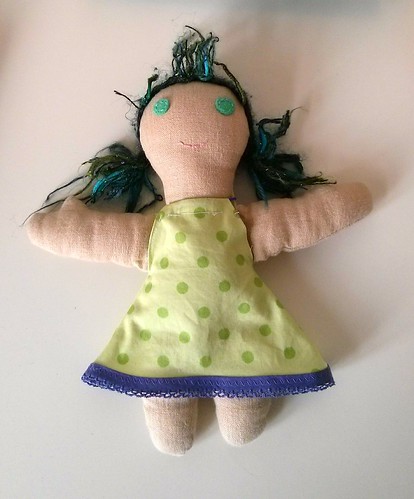
Zoe in her dress

The Wee Lass and I also made a dress for Zoe, the dolly we made together some time ago.


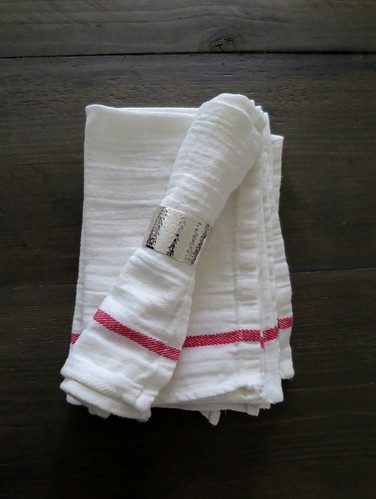
cloth napkins

On a more practical note, I recently made some cloth napkins from IKEA tea towels. I just cut the (39-cent) tea towels in half and hemmed the raw edge. I got the idea here. I chose to wash, dry, and iron before cutting in half and hemming, but it was still a super quick and satisfying project to add a few more napkins to our stack.

Photographs and artwork by Allison Gryski. © All rights reserved.

05 October 2014

Sewing in the last year

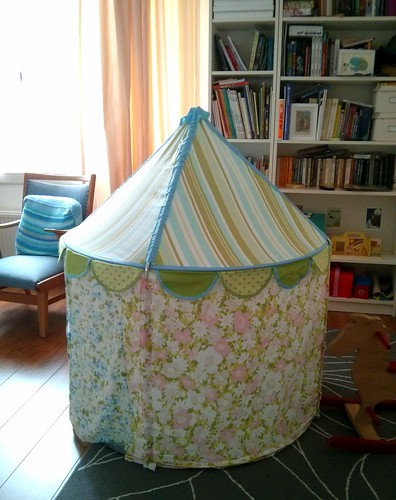
The last year was not a prolific sewing year, but I did do one BIG project and one small project that have seen a lot of play. The first was a makeover of the IKEA play tent. I followed this tutorial and found it super helpful.


play tent

To be honest, this project took me well out of my sewing comfort zone. I don't really like working with huge pieces of fabric (having to lay them out on the living room floor was the only option and not convenient) and sewing around the hoop frames was tricky (at least on my machine). I do need to do a couple small fixes, nearly a year after "completing" the tent. I was way too generous with the height of the fabric walls because I was concerned about not having enough to attach well and as a result, the tent has a tendency to shift and list to the side. I also need to add in some seams that I foolishly skipped in the top that act as stoppers for the tent poles. The Wee Lass has not found these minor issues to interfere with playing, but it definitely needs stitching by hand at some point.


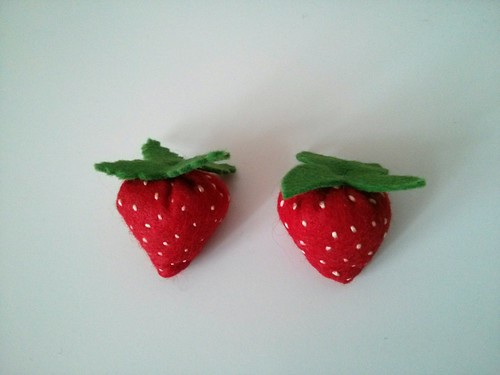
felt strawberries

The other project was some small felt play food strawberries. Embroidering all the seeds (which I did before stuffing and sewing) took an obscenely long time, but the result is adorable. Here's the tutorial that I followed.


Photographs and artwork by Allison Gryski. © All rights reserved.

18 July 2013

There was one with polkadots.

When there's not much time for sewing projects, I tend to stick to the highly functional ones. A book bag for library visits and a zip pouch for spare toddler clothes are two recent-ish projects.


Book Bag

The book bag is a lined tote with a pocket on the inside. I love the cute gnomes and woodland creature fabrics available in Holland and they paired well with a classic red and white spotted fabric.


Book Bag (inside out)

For the zip pouch, I used some exotic fabric from a bundle of fat quarters and some tiny white on blue polkadots for lining. It really should have been wider, but I wanted to work with what I had on hand and all my zippers were short. It's just big enough to fit one change of clothes for the Wee Lass, but I will probably make another one when I have a chance to pick up some longer zips.


Zip Pouch

I don't tend to sew from a pattern, so I just made both of these up as I went along and using materials that I already had. Given my time constraints for crafty projects, having a good stash of stuff has been invaluable. I try to keep a nice variety of ribbons, elastic, zippers, snaps, and embellishments around so that I don't have to delay a project by going shopping for supplies. This can also lead to some delightful serendipity. I am so pleased with how Zoe's slightly wild blue-green hair turned out and it occurred largely because I didn't have any leftover yarn in a more conventional colour.

Photographs and artwork by Allison Gryski. © All rights reserved.

08 July 2013

And then we made a Dolly.


Zoe the doll
The Wee Lass and I made a fabric dolly together. She's very interested in my sewing machine and frequently asks to do a sewing project. We used tea to dye some linen from a thrifted shirt (we needed only a small part of one arm of the shirt for this dolly).


I drew a pattern on paper based roughly on the shape of her bunny (amusingly, also made from a thrifted shirt) and then traced around it to add seam allowance. I made the arms a bit fatter (easier to flip and stuff) and added thumbs. We sewed up the arms and legs together and stuffed them full of "fluff" as she calls it. I added felt eyes and a mouth with some embroidery thread before sewing the body up and attaching the arms and legs. I attached a little loop of embroidered trim so we could easily clip the dolly to a bag or the stroller if she's coming out on adventures.


I added yarn hair, based on a simple tutorial that I found online. Since our dolly didn't have a perfectly round head, I found it worked better to start the "scalp" at the hairline and then spiral in, rather than the reverse. I wove in the loose ends of the braid to fill any gaps and secure it. I just added a little bit of long yarn hair to make pigtails and bangs, rather than covering the whole head.


This type of "flat" doll is quite approachable for a novice sewist and lots of fun to involve a little one in the process. Next time the Wee Lass requests a sewing project, I think we'll make her dolly a dress.


Photographs and artwork by Allison Gryski. © All rights reserved.

16 November 2012

Tutorial: Fabric Bunting


Fabric Bunting

I made some bunting not too long ago and took pictures of the process. So here is a tutorial for how to sew some for yourself. It's pretty, it's easy, and it's great if you have lots of small bits of fabric from other projects that need using up.

Materials:
-assorted fabrics
-bias tape
-pinking shears
-piece of scrap cardstock or paper

Step 1: Make a flag template

I made a template to trace out of some scrap cardstock I had laying about. Don't forget to include seam allowance (1/4" on each side).


Bunting Flag Template

I used the following method: Draw a line of the width of the flag. Find the middle and draw a line down for the length, forming a T. Draw lines connecting the ends of your lines to make your triangle shape. Of course, you don't need to limit yourself to triangles. Scallops or squares are also fun.

Step 2: Cut out your flags


Cutting out Bunting Flag

Cut out pairs of triangles in a variety of fabrics. You can either trace the template onto fabric with a washable fabric marking pen or pencil or cut around it carefully, like I did.


Step 3: Sew each flag


Turning the Flag

Sew each flag with 2 pieces with right-sides together, leaving the top edge open. Trim your seam allowance with pinking shears to make it less bulky. Then flip it right side out, using a blunt knitting needle (or similar object) to poke the point out. The raw top edge will be hidden when you attach it to the bias tape.


Bunting Flags

For beginners, you turn at the point as follows: stop sewing with the needle down through the fabric, then lift up the presser foot and rotate the flag, then put the presser foot back down and continue sewing.

Alternately, you can sew your flags right sides facing out and then edge with decorative bias tape, or trim with pinking shears or do a zig-zag stitch to prevent fraying.

Step 4: Attach your flags to bias tape


Attach flag to bias tape

Pin your flags inside the fold of the bias tape, then sew along the open edge of the tape to attach the flags.

Step 5: Hang your bunting

Ta-dah! Here's my bunting hanging in our living room. If you make some bunting following this tutorial, please share your pictures in my flickr group!


Fabric Bunting


Photographs and artwork by Allison Gryski. © All rights reserved.

14 November 2012

A new project begins


Fabric for a new project

I'm so excited to work on my next project.

I'm doing a makeover of one of these. It's made with hideous material, but it's a fantastic shape and size.

I was inspired by seeing this one.

I plan to use the fabric pictured above, with accents inspired by this patchwork.


Photographs and artwork by Allison Gryski. © All rights reserved.

12 November 2012

Introducing Gabrielle

I made the Wee Lass a dolly! I used the cute "I love Paris" doll kit by Miko Design that I saw in a Dutch magazine. We named her Gabrielle.


Gabrielle

It was really a quick sew, including all the little accessories. These are set aside until the Wee Lass is a little bigger.


Gabrielle's accessories

For now she has her Eiffel tower and souvenir bag. We also like to use some of our play food, in particular this wooden chèvre.


Gabrielle's chevre

A fun discovery was how easy it is to make an elastic waist skirt. I already have plans to make some skirts for the Wee Lass come spring and summer.

Photographs and artwork by Allison Gryski. © All rights reserved.

05 August 2012

Finishing is Fun!


Fabric bunting

Today's Studio Sunday was deeply satisfying because I finished 3 things. Two of them had been in progress for awhile and one was completely new. I am especially pleased with the fabric bunting. Our living room is much more cheerful now.


Fabric bunting

I also made a bird garland out of an IKEA placemat for the Wee Lass's room. She was very excited when she saw it, exclaiming "Dida!" (her word for birds). I think it might be cuter if I hung them off of a twig instead of yarn, but this was what I had on hand. I might try some jute twine instead to see if that is nicer, while still being less fiddly than figuring out how to hang twigs securely from plaster walls.


Bird garland

And the item I made from scratch was an apron, also for the Wee Lass, out of an IKEA tea towel. We used it almost immediately as she helped make dinner (her job was helping rinse spinach and transferring it from the colander to the pot). Of course, at 16 months old, it's all still a game to her, and she was keen to then transfer the spinach back into the colander!


Wee Apron


Photographs and artwork by Allison Gryski. © All rights reserved.

23 July 2012

Sea Monster Portraiture


Sea Monster Portraits

Studio Sundays have been skipped lately due to a holiday to Canada. Before going, I made a bunch more sea monsters to give as presents. I've now made 8 in total and they have happily gone off to nibble on assorted babies around the world (several are in Canada, but there's also some in Amsterdam, New Zealand, and the U.K.). This past weekend I worked on my bunting again and finished all the flags, so when I get a smidge more sewing time, I hope to assemble it and have a ta-dah!

Photographs and artwork by Allison Gryski. © All rights reserved.

03 June 2012

Sea Monster Assembly Line

This weekend's Studio Sunday has been an assembly line of sea monsters.


Sea Monsters in progress

I have had a couple "you should sell those" comments but I get bored way too fast to make the same thing over and over. The fun for me is in making new things and figuring out ways to make something better. After that, it becomes mindless rather than creative. Four or five is about the maximum number of editions I seem to have fun making. Once these guys have eyes and mouths, I'll have made 8 in total and I think I'm stopping there. That said, I'm going to have a lot of fun sending these monsters off to their new homes.

Photographs and artwork by Allison Gryski. © All rights reserved.

20 May 2012

Zippered pouch in progress


Owl zippered pouch

The results of today's time in my studio are a few more flags for my bunting and most of a zippered pouch. Also I did some boring repairs on pyjamas. This was my first go at a zippered pouch and my first go with the zipper foot on this sewing machine. It was much less of an ordeal than I'd been expecting. Why do all us amateur sewists have such an irrational fear of the zipper? I've only used them a couple times, but both instances have been pretty easy in the end.

I am following this advice for making a zip pouch with neat corners, so I still have some hand sewing to finish it off. This zipper end finishing bit is rather more fiddly than fun. I am tempted to make one the quickie way (just sewing all the way around in one go) and see how it turns out for comparison. If I do, I'll post side-by-side pics of the two pouches.

Today's other accomplishments include making and eating (with some help) a rhubarb-strawberry-apple cobbler. Yum!

Photographs and artwork by Allison Gryski. © All rights reserved.

06 May 2012

Studio Sunday

Today was my first "Studio Sunday", also known as "Daddy-Daughter Day". My two sweeties went out to the park and grocery store while I got to have some time on my own to create.


Beginnings of Bunting

I started a project that I've been thinking about since before the Wee Lass was born.... Some pretty bunting. I originally planned to put it in her room, but I think it may end up in the living room. One of the things we couldn't reasonably bring with us overseas was our art, and our plain white walls are looking especially bare since I took down the star garland after New Year's.

I still have several more flags to make before I assemble the bunting. It was a glorious couple hours playing with my fabric. The plan is to have Studio Sunday every other week, and I'm looking forward to that time especially reserved for creative pursuits. Laundry is to be strictly ignored!

Photographs and artwork by Allison Gryski. © All rights reserved.

27 April 2012

Sea Monster Puppet


Sea Monster

I ran across a washcloth puppet tutorial recently and having just seen some super cheap and fun polka-dot towels at the Zeeman, I had to make one. I ended up scaling up the pattern quite a bit or I don't think it would have fit over an adult hand. This may have been partly due to printing on A4 rather than Letter size paper, but I ended up roughly drawing the pattern again with the paper in "landscape" orientation.

If/when I make another one, I will probably switch the seam to run down the side rather than the middle of the head (the dorsal fin could easily be attached in a slit like the other fins). Overall this was a great (i.e. quick, easy, and pleasing) project. I got most of it done while the Wee Lass emptied a bag of clothespegs and happily tried to pry them apart.


Photographs and artwork by Allison Gryski. © All rights reserved.

18 February 2012

Tutorial: How to Sew a Stuffed Carrot Toy

There's a bunny who's been looking for a carrot, so I rooted around my fabric stash and this is the result. I had no plain orange fabric, but I love the "heirloom variety" carrot that resulted with this patterned fabric.


Bunny and Carrot


If you'd like to make a carrot of your own, then you will need...

Materials
-felt (for the leaves)
-fabric (for the carrot)
-some stuffing
-paper (to make a pattern)


Carrot Materials


Step 1: Cut the carrot out

First you need to make your pattern. Draw a carrot shape. Then add some seam allowance by tracing around it a bit larger (however much you want to make your seams). Then draw the leaves. They don't need seam allowance since they'll be made out of felt. This part really doesn't need to be that precise. Cut out your pattern and pin to your fabric or trace with a fabric marking pen and cut out. Cut out 2 matching carrot pieces and however many leaves you like. I cut 3 leaf pieces. Mine match, but there's no reason they need to be identical.


Carrot Pieces


Step 2: Pin and sew the carrot together

Pin the carrot right sides together with the leaves tucked inside. I always have the wrong instinct to have bits like the leaves sticking out, but then when you flip it, they'd be on the inside. So make sure your leaves are tucked in and be careful to keep all but the stem away from the edges so that you don't catch extra bits when sewing.


Pinning and Sewing the Carrot


Sew around the carrot, leaving a gap of at least an inch on one side for turning it right side out. I sewed back and forth over the leaves a few times to make sure all three were well secured.

Step 3: Flip and iron the carrot

Flip your carrot right side out and iron it flat, making sure to iron in the edges of the opening. This makes it easier to sew up later.


The Unstuffed Carrot


Step 4: Stuffing and finishing the carrot


The Stuffed Carrot


Now stuff in lots of filling. Sew up the gap using a ladder stitch.

Voila! The Finished Carrot Toy!

If you make a carrot toy following this tutorial, I'd love to see it! Please add your pictures to my flickr group.


The Finished Carrot

Photographs and artwork by Allison Gryski. © All rights reserved.

04 October 2011

Sewing projects of late

I've been on a bit of sewing kick lately. I first unpacked my sewing machine in order to line the Wee Lass's curtains so they'd block the light better during naps. Then I received a fabulous baby quilt for the Wee Lass and couldn't help but be inspired. Having a baby has been giving me lots of ideas for things to make, but not a lot of time. My sewing tends to happen in many small increments over naptimes. So far, I've made a fabric book and a tag square toy.


Octopus Prototype


The latest project is this octopus. This is actually a prototype as I'm still working out the pattern and construction. I may (eventually) post a tutorial once I refine it. The end result is still pretty cute though and the Wee Lass definitely enjoys chewing on it.

Photographs and artwork by Allison Gryski. © All rights reserved.

01 October 2011

Tutorial: Sew a Tag Square Baby Toy


Tag Square


The ribbon for the snap closure on the fabric scrap book is the Wee Lass's favourite bit to chew, so I thought I'd make a snap-free tag square toy. Before I had a little one, I'd have wondered how this scrap of fabric and trims could be interesting, but really, anything with bits to hold and that she can put in her mouth is currently a popular toy. Conveniently, it's a project you can finish during a single naptime.

Materials:
  • 2 same-size squares of fabric
  • Assorted trims, ribbons, or strips of fabric
  • Some polyester filling


Tag Square Materials


Step 1: Design and Pin your Tag Square


Tag Square Step 1


Cut various lengths of trim, ribbon, or strips of fabric to form your tags. If you're using strips of fabric, you'll need to finish the raw edges somehow so that they don't fray during the no-doubt-frequent washings (or sew little tubes so the raw edge is inside). Fold each tag in half (with the right side facing out), and pin in between your two squares of fabric (with right sides of fabric together). I did 3 tags per side. Leave a good bit of space near the corners to account for the seam allowance and don't pin the tag(s) in the middle of one side, so that you have a gap for flipping the whole thing right side out.


Step 2: Sew Tag Square Together


Tag Square Step 2


Sew around your tag square, leaving a good gap for turning. Strongly backstitch on either side of this space. I also backstitched over each tag, to ensure that they were extra secure. When you're finished sewing, turn your square the right side out, and iron it flat.

Step 3: Filling your Tag Square


Tag Square Step 3


Now you need to stuff your square. Take a small bit of filling and stretch it out thinly until it's nearly the size of your square. Then stuff it inside and spread it out.

Step 4: Finishing your Tag Square


Tag Square Step 4


Now pin the tag(s) that you left off from your gap for turning, and sew them to one side of the opening. Now that they're fixed in place, quilt your square. This will hold the batting in place. Make sure that you run at least one line of stitching down along the opening to close it up. I used a square spiral pattern, working from the middle out.

That's it! I wondered whether it was worth writing a tutorial for this at all since it's super simple, but I figure that beginners, tired new parents, or parents-to-be might find it helpful. If you make a tag square baby toy inspired by this tutorial, I'd love to see it! Please add your pictures to my flickr group.


Tag Square Baby Toy


Photographs and artwork by Allison Gryski. © All rights reserved.

28 September 2011

Tutorial: How to Sew a Scrap Fabric Baby Book


Rainbow Scrap Fabric Baby Book

Books, like all other objects, are for eating, according to the Wee Lass. Since I'm not that keen on her tasting and nibbling her board and paper books, I thought I'd make her a fabric one. This is a great project for all those tiny scraps in your stash. I went with a rainbow theme, but it would be fun to make an I-spy book with lots of animals and objects to find. I also just did totally random scrappy blocks, but if you have more time, you could make it a fancy block sampler.

Materials:
  • Lots of scrappy bits of fabric
  • Some polyester filling or scraps of quilt batting
  • Some double-fold bias tape for binding
  • Some ribbon, a bit of interfacing, a snap (optional)


Scrap Fabric Mess


Step 1: Sew some patchwork blocks

First up, you need to make the pages of your book. I would recommend making 6-10 blocks, for a book with 3-5 pages. The one I made has 5 pages (red and pink covers, pink/orange spread, yellow/green spread, green/blue spread, and blue/purple spread).


Fabric Book Pages


Select your scraps and sew some together. I always backstitch at the start and end to secure the stitching. I did not do any planning or fussy cutting. I just sewed bits together, ironed seams to one side, then trimmed off excess and added another strip where necessary. Once it looked good, I stopped. You could certainly be more methodical and it would involve less futzing at the end. To make them the same size, I added a few strips here and there and then I picked the smallest of my squares and used it as a template to trim the others to match.

Step 2: Sewing your pages


Fabric Book Step 2


Now that you have a stack of blocks (all the same size) pick an order for the blocks. The first and last block will form the front and back covers. Pair your blocks up into the pages and pin them right sides together. Make sure you've got them facing the way you want and decide which edge will go in the binding (you won't be sewing along that edge until later). (If you want a closure, read step 2b now.) Sew each page around 3 sides, leaving the binding edge open. Then flip it right side out. I find a blunt knitting needle helps poke the corners out well. Iron it flat.

Step 2b: Adding ribbon for a closure (Optional)


Fabric Book Step 2b


If you want to add a snap or tie-ribbon closure, you'll need to pin that inside the cover. You can either do a single ribbon with a snap on the front like I did, or two ribbons that tie the book closed. The snap was probably a strategic error on my part as the Wee Lass loves chewing on the strap (it's easy to grasp) and I'm less keen on the metal snap in her mouth. If you want to have tie ribbons, just put a length of ribbon inside the seam (with ribbon in between the right-sides) that will be the outside edge of the front and back cover pages. For the snap closure, put the ribbon just on the back cover. I suggest a heavier, grosgrain ribbon, like I used to withstand pull of the snap.

Step 3a: Adding snap for closure (Optional)
Before you stuff and quilt your front cover, you need to add the snap. You need to do it now unless you want the back of the snap to show on the first page of the book. I preferred to have it hidden inside. I think it's wise to iron a scrap of interfacing on the inside where the snap will be attached to strengthen the fabric. Add your snap according to the directions on the snap package. The upper part should go on the ribbon, the lower part on the front cover.

Step 3: Stuffing and Quilting your pages


Fabric Book Step 3


Now stuff your pages with some batting or polyester fibre filling. If you're using the latter, pull it out until it's quite thin or your book will be super poofy and hard to bind. Tuck the batting inside the page and spread it out. Leave a good gap on the binding side with NO filling, or again, your book will be hard to bind. I'd suggest about twice your seam allowance. I only left the seam allowance empty and it wasn't enough, so thus speaks the voice of experience. Now you need to quilt the page. I did square spirals (start in the middle and work outwards) and giant zig-zags. Whatever pattern you chose, make sure that you run a line down by the empty part at the binding edge to hold the stuffing in.

Step 4: Binding your book


Fabric Book Step 4


Once you have quilted all your pages, pin them together at the binding side. I suggest you sew them together at this point, to make adding the binding easier since the pages will already be fixed.


Fabric Book Step 4 cont'd


Once you've done that, pin the bias tape along the binding, folding the raw ends inside. You might find it easier to iron them in once you've measured the length you need and then pin it. At this point, if you left a generous seam allowance empty of filling, you should be able to just sew the binding on. If, like me, you're finding it quite snug and worried that you'll miss catching it on the underside, handstitch it on first, then zig-zag it to make it secure.


Front and Back


This project is a good one for the busy mama as you can just fling together a few scraps when you have a free moment and not worry about precise measuring and cutting. That's my least favourite bit of quilting, but I know some people love it, so if that's you, ignore me, and make some fiddly quilt blocks for your book! The book has been officially approved by the Wee Lass as delicious. If you make a fabric book inspired by this tutorial, I'd love to see it! Please add your pictures to my flickr group.


My book


Photographs and artwork by Allison Gryski. © All rights reserved.