Showing posts with label recipe. Show all posts

29 September 2014

Cinnamon Apple Scone Recipe


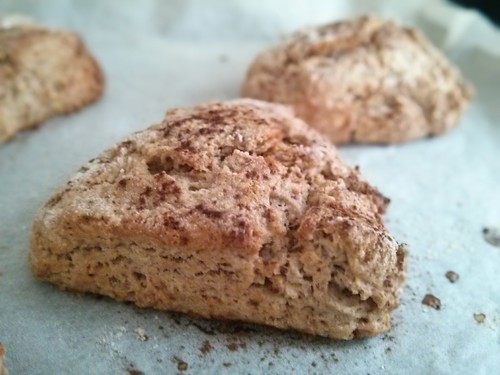
Cinnamon Apple Scones
It was a grey, drippy afternoon, so the Wee Lass and I decided to bake something tasty for our afternoon snack. She really wanted cinnamon buns, but we didn't have time to wait for rising, so we made scones instead. We modified our recipe to make them a bit cinnamon-bun-inspired.


Cinnamon Apple Scones
Makes 6-8 scones
  • 2 cups flour
  • 1/4 cup brown sugar
  • 2 tsp baking powder
  • 2 tsp cinnamon
  • 1/4 tsp salt
  • 1/3 cup butter (cold)
  • 1/2 cup milk
  • 1 egg
  • 1 small apple (peeled and grated)

Pre-heat your oven to 190°C.

Mix the dry ingredients in a mixing bowl, then cut in the butter until you have fine crumbs. Don't worry if there's the odd larger bit as this will just make your scones flakier. Mix in the grated apple (we used a Royal Gala). Add the egg and milk, and mix to make a dough. Don't overmix it or the scones will not be as tender.

Flour your counter top or a large cutting board and pat your dough out into a circle about 2 cm thick. Cut it into 6-8 wedges and put on a parchement paper lined baking sheet. Sprinkle the tops with a bit more cinnamon. Bake for 15-20 minutes, until just slightly browned on top.

Best eaten warm with a generous slather of butter!

You can find more of my recipes in the Food section, in the tabs along the top.

Photographs and artwork by Allison Gryski. © All rights reserved.

04 August 2013

The Most Delicious Panzanella


Panzanella

One of our favourite easy dinner dishes this summer has been panzanella. It's quick to make, refreshingly cool on a hot day, and it gets gobbled up by the Wee Lass.

Here's how I make it for 2 adults and 1 toddler ...

Most Delicious Panzanella
stale bread (good quality crusty French or Italian style bread, approximately 1 cup per person when cubed)
3 fresh tomatoes (approximately 1 per person your salad will serve)
1/2 fresh cucumber (optional)
1/2 to 1 can of diced tomatoes (optional -- desirable if your bread is rock solid stale)
4 Tbsp olive oil (really just a generous glug ... I don't actually measure it)
2 Tbsp balsamic vinegar (or red wine vinegar or cider vinegar)
garlic (1 clove)
shallot (optional)
capers
Taggia olives
assorted fresh herbs (basil, thyme, oregano)
salt and pepper

Saw the stale bread into small bite-size cubes and place in a shallow salad bowl or deep pie dish. I used the end of a loaf of rosemary foccaccia. If your bread is really stale, you'll want to make sure it all gets thoroughly soaked, so that's why a shallow dish works better. Now you're going to make a juicy concoction to dump on top. You could mix it in a separate bowl first, but I always just add it to the bread as I go.

Finely chop your tomatoes (and cucumber if you're using it) into small cubes. If your bread is super stale, then add a can of diced tomatoes for extra liquid and tomatoe-y goodness (I didn't need it in this case). Drizzle on a generous amount of olive oil (use a bit more if your bread is really hard) and add the balsamic vinegar. Mix this sauce around to combine. You can add finely chopped garlic and shallot directly, but I prefer to soften the flavour of it with a quick saute. I actually forgot to add it in the pictured salad and the whole thing was still tasty.

Add a bit more olive oil if it seems like a good idea. Toss in a big spoonful of capers and enough olives for everyone to get at least 3 or 4. Finely chop a generous bunch of fresh basil, thyme, and oregano and add to your bowl. Sprinkle with sea salt and freshly ground black pepper. Mix it and let it sit for 5 minutes before serving.


Panzanella

Photographs and artwork by Allison Gryski. © All rights reserved.

31 March 2013

Raspbery variation


Raspberry Nanaimo Bar
I love homemade Nanaimo Bar and every now and then I get a serious craving. A while back, I decided to experiment with making a raspberry version. I just added some (thawed) frozen raspberries to the icing layer. It made it pretty and pink and it was so yummy.

Photographs and artwork by Allison Gryski. © All rights reserved.

19 December 2011

Recipe: Nanaimo Bar

Nanaimo Bar isn't exactly a traditional Christmas treat, but it is a traditional Canadian treat, and as an expat, I have a perfect excuse to indulge such cravings. It's also made in easy stages, which is a plus with a small one around. I'm not sure I'll have time to make rolled and cut cookies this year as they're pretty time consuming.


Nanaimo Bar


I had to substitute "volkoren" biscuits (wholewheat digestive biscuits) for the graham crackers, but they're nearly the same. If you wanted to make it more Christmas-y, add some crushed up peppermint candy canes to the bottom layer in place of part of the nuts/crumbs and add a couple drops of peppermint essence to the icing layer.

Bottom Layer
1/2 cup butter
1/4 cup sugar
2 oz semi-sweet chocolate
1 egg, beaten
1 tsp vanilla (optional)

Melt the butter, sugar, and chocolate in a double-boiler. Then stir in the egg and vanilla and remove from the heat.

Add:
2-1/4 cup graham cracker crumbs (or whole-wheat digestives)
1 1/2 cup finely chopped walnuts (replace with more crumbs if you have a nut allergy)
optional: replace some of the nuts/crumbs with smashed up hard peppermint candy.

I use the blender to make the crumbs and chopped nuts. You don't want it completely powder, but avoid big pieces or the bottom layer will not have structural integrity when you cut it into squares.

Pack this mixture into a 9x9" pan (I used a 20x30cm pan, which was a little large and required extra for the middle and top layers). Refrigerate for 2 or more hours, until it's solid.


Nanaimo Bar


Middle Layer
1/4 c butter (absolutely NOT margarine)
2 cups icing (powdered) sugar
2 tsp vanilla
3 Tbsp milk
optional: a few drops peppermint essence

Beat these together until smooth. Spread on the crumb layer and refrigerate another 30-60 minutes until the icing is firm.

Top Layer
4 oz chocolate (bitter plus semi-sweet to taste)
1 Tbsp butter

Spread the melted chocolate on the chilled icing layer (try to do it pretty quickly or the icing will go all melty). I make this layer more bitter than I would like on its own in order to balance out the sweet icing layer.

Refrigerate it over night, then cut into squares the next day. If you wipe down the edges of the pan and use a knife run under hot water you will get a tidier result than I did. These are dangerously addictive, but very rich. Best served with a glass of milk or a cup of coffee.

For a twist on this, see my Raspberry Variation.

You can find more of my recipes in the Food section, in the tabs along the top.


Nanaimo Bar


Photographs and artwork by Allison Gryski. © All rights reserved.

20 March 2011

Sunday Scones


Scone


I made scones for breakfast today. Inspired by watching a Julia Child Crêpes Suzette recipe recently, I also made an orange-citrus butter for a special topping.


Orange Citrus Butter


I didn't follow a recipe at all for the butter, so most of this is just an approximation after the fact. I tasted it as I went, which is always the best way to make something yummy. Here's how I made it:

Orange-Citrus Butter
  • 1 blob of softened butter (I probably had about 1/4 c)
  • zest of 2 oranges (I used a microplane, so it's really fine)
  • few tsp freshly squeezed lemon juice
  • about a Tbsp of granulated sugar, plus same or a bit more of icing sugar

Mix all together until it forms a uniform paste. Mine was quite soft, but since it was going on warm scones, I figured it would go all melty anyhow. I'd probably use all icing sugar another time to try to make it a bit less soupy.


Scones on Sunday


You can make the butter while the scones bake, so it's really not that much of an extra effort. It was oh-so-yummy and felt very indulgent.

You can find more of my recipes in the Food section, in the tabs along the top.

Photographs and artwork by Allison Gryski. © All rights reserved.

01 March 2011

Recipe: Spice Cakes with Lemon Icing

When you move overseas, to a country where you don't speak the language, you often rely on the kindness of new friends. I've been baking lots of treats recently as thankyou's to people who have helped us get bulky baby items home (and up steep flights of stairs) and translated various important papers for us. The currency of homemade cupcakes seems to be just as appreciated here in Amsterdam as it was in Montreal. So wherever you are, if you want a sweet treat or to say thank you to a kind friend, these cupcakes are a nice alternative to my Scrumptious Chocolate Cupcakes and just as delicious.


Lemon Spice Cupcake


This spice cake recipe was often made as a birthday cake when I was growing up and was always accompanied by lemon icing. The two are inextricably linked for me. This is a no-fuss one-bowl type of cake.

Spice Cake
Makes two round 9" layer cakes or about 16 cupcakes.

In a large bowl, mix all at once:
  • 2 c flour
  • 1 c sugar
  • 1/2 c soft butter
  • 1/2 tsp each: cloves, nutmeg (grate fresh!) and salt
  • 1 tsp cinnamon
  • 1/4 each: tsp allspice, baking soda
  • 1/4 c molasses (fancy-grade)
  • 1/2 c milk

Grating the nutmeg fresh makes a big difference and it only takes half a minute on a microplane. (Seriously, we thought this step was going to be fiddly and annoying, but it grates up so fluffy that you don't need to do much to get your 1/2 tsp!) If you're using electric beaters, beat for just 2 minutes until it comes together. If you overmix, the cake will turn out dry.

Stir in:
  • 2 tsp baking powder

Beat in:
  • 2 eggs
  • 1/3 c milk

Beat batter for another 2 minutes or less, until just combined, then pour into your pans. If you're making it as a cake, be sure to grease and flour the cake tins. For cupcakes, you can do the same, use paper liners, or bake in silicone muffin cups.

The original cake baking instructions are to bake at 375°F (190°C) for 25-30 minutes. For these cupcakes, I baked at 180°C (355°F) in a convection oven for 20-25 minutes. Check on them early and test with a toothpick to determine when they're done.

For the icing, I blend about 1/4 cup butter with 1 1/2 - 2 cups icing sugar, the juice of half a lemon and the zest of 2 lemons.


Lemon Spice Cupcake


You can find more of my recipes in the Food section, in the tabs along the top.

Photographs and artwork by Allison Gryski. © All rights reserved.

22 February 2011

Recipe: Macaroni and Cheese

Homemade macaroni and cheese definitely qualifies as one of my top comfort foods. This recipe is based on how my Dad taught me to make it.


Macaroni and Cheese


Ingredients
  • extra-old cheddar cheese
  • macaroni
  • milk, butter, flour
  • bread crumbs
  • green peas, bacon, shallot, mushrooms (optional)

Grate a big hunk of extra-old cheddar cheese (the white stuff preferably and the older/sharper the better) and set aside. While your macaroni is cooking, make a white sauce (aka Béchamel). The basic ratio is 1 Tbsp butter and 1 Tbsp flour to 1 cup of milk (or 2-2-1 for a thicker sauce, but since you'll be adding cheese, stick with the 1-1-1 ratio for this recipe!). How much sauce you make depends on how much macaroni you are making. I usually do a 2 cups of milk batch for a 9x13" dish of macaroni and cheese.

Make your roux (melt the butter, mix in the flour, and cook a bit), then slowly whisk in the milk. Bring it up to simmering and then turn down, stirring until it thickens. If you get lumps, whisk it vigorously to remove them. You can avoid lumps by pre-warming the milk and adding it slowly, so it blends evenly. Once the sauce is thickened, slowly add 2/3 of your grated cheese, stirring it in as it melts.

You can also optionally cook some delicious add-ins like green peas, chunks of bacon, chopped shallots, sliced mushrooms, or anything else you fancy in your macaroni.

Mix your cooked macaroni and cheesy white sauce and put it all in a baking dish. Stir in any add-ins. Top with the remaining 1/3 of your cheese, and add lots of bread crumbs to the top as well. Bake at 350°F or 180°C for about 15-20 minutes or until the sauce is bubbling up and the top is nicely browned.


Macaroni and Cheese


You can find more of my recipes in the Food section, in the tabs along the top.

Photographs and artwork by Allison Gryski. © All rights reserved.

17 February 2011

Recipe: Fresh Pasta

Making fresh pasta is actually remarkably easy if you have a pasta roller. It really only takes me about 20 minutes from start to finish and some of that is time to let the dough rest. (A word to the wise: The first time I remember it taking us something like an hour, so don't despair it if takes you some time to get the hang of the rolling and flouring process.) If you've never had fresh, homemade pasta, it's completely different from dried or store-bought fresh pasta. The texture is much more delicate.


Fresh Pasta


Step 1: Make the Dough

Essentially, you use 1 egg for every 2 people who will be eating it, and 100g (about 1 cup) of flour per egg. You can use up to half semolina. (If you want to dry the pasta to store you can use warm water and some olive oil instead of the egg.)


Egg and Flour


In a large bowl, make a well in the flour, crack in the eggs, and beat eggs with fork, slowly working in the flour from around the edges.


Mixing Egg into Flour


When it forms a dough, knead a bit more flour in on the counter until it's not so sticky.


Mixing Dough


You'll definitely have leftover flour that didn't work into the dough, but that will get used in the next step. If this is your first time making pasta, you might want to leave the dough to rest for 20 minutes (covered), and it will be easier to roll out. I never bother with this resting period anymore.


Finished Dough


Step 2: Roll out the Dough

Press your dough into a flat shape and pat with flour on both sides until it's not sticky.
Set up your pasta roller and, starting on the widest setting, roll your pasta through. (You might end up with it being sticky and tearing if you didn't let it rest or didn't flour it enough. Don't worry, it will come together).


First Roll Through


Flour it, fold it in half, and repeat until it no longer gets sticky. This stage is basically just kneading in more flour. Eventually, it will start to feel smooth and a bit leathery.


Smooth Dough


Now you can start rolling it thinner. Go to the next setting, roll it through and lightly flour it if there's any trace of stickiness. Keep repeating this until you're down to the next to last or last setting. For angel hair, you need to go to the thinnest setting, but everything else is fine on the next-to-last setting.


Dough Rolled Thinly


Step 3: Cut into Noodles

Cut your sheet of pasta into the lengths you want your noodles.


Cut Pasta into Noodle Length


At this point, you should leave your dough to rest for at least 10-15 minutes. If you try to cut it now it will be too sticky and gum up the cutter and the noodles will stick to themselves. Make sure to flour it well if you stack the pasta sheets.


Resting Pasta


When your dough is ready, run it through the cutter (or cut by hand). Catch the noodles on your hand as they come out... this is a lot easier if you're not trying to take a picture of it while you do it!


Cutting Noodles


Toss each batch of noodles with flour to prevent sticking. If you're not cooking your noodles immediately, mound them loosely and cover with cling film so they don't dry out.


Fresh Pasta


Step 4: Cook and Eat your Pasta


Homemade Pasta


When you're ready to cook your pasta, drop it into salted boiling water for just a few minutes. These noodles took 4 minutes to cook. We served them with a mushroom-leek cream sauce.

You can find more of my recipes in the Food section, in the tabs along the top.

Photographs and artwork by Allison Gryski. © All rights reserved.

15 February 2011

Recipe: Scrumptious Chocolate Cupcakes

Happy February 15! If Valentine's Day didn't go quite as you hoped and you need to console yourself (or plead forgiveness) with chocolate, then follow along for some super easy chocolate cupcakes! They're also good if you just want to shower someone with extra chocolatey affection and have something yummy to nibble on with your coffee, tea, or a glass of milk!


Breakfast Cupcakes


We have a lot of birthdays to celebrate in February, so this recipe often appears about now for that reason. Of course, this year, we're mostly occupied thinking of the expected new birth day, which will probably be sometime in March! In any case, I made these last night and I must say, cupcakes for breakfast are delightful!

Scrumptious Chocolate Cupcakes
Makes a batch of 24, so you'll have plenty to share (or freeze for later).
Preheat oven to 375°F or 180°C.

Combine in a medium sized pot (about 1 quart size):
  • 1 cup water
  • 1 cup margarine, Crisco, or butter
  • 1/2 cup good quality cocoa powder (the bittersweet stuff for baking, not the drink mix!)

Bring to a boil and remove from heat; stir until shortening is melted (put on heat again if necessary).

Whisk in:
  • 2 cups white sugar and 1/2 tsp salt
  • 2 cups flour and 1 tsp baking soda

Whisk well to get out the lumps.

Stir in:
  • 3 eggs
  • 2/3 cups sour cream (or plain yogourt)

In a pinch, you can replace the sour cream or yogourt with milk or soy milk, but use a scant 2/3 cup or it will be too runny.

Ladle the batter into greased or lined muffins tins (or silicone muffin cups) and bake for 15-20 mins. You can also make this as a cake in a 9x13" pan or two round 8" pans and bake it for about 35-40 mins.


Scrumptious Chocolate Cupcakes


I like to decorate my cupcakes with lemon or mocha icing and sprinkles. I use about 2 c of icing sugar to something like 1/4 or 1/2 c of butter. Do not even think of using anything other than butter! I don't really measure it, but just adjust as I go until it tastes "right" and is a good consistency. If you're making the lemon icing, then thin it out with lemon juice and add the zest of 1 lemon. If you're making the mocha icing, then replace some of the icing sugar with bittersweet cocoa powder and thin it out with strong coffee.

Spread the icing on your cupcakes, add some fancy sprinkles, and then gobble with glee!

Photographs and artwork by Allison Gryski. © All rights reserved.
20 December 2010

Recipe: Cheesies

My Dad's Cheesies are the last of my three classic Christmas cookies (see also Gingerbread Cookies and Shortbread Cookies). They are quite possibly my most-requested recipe ever. I think perhaps because everyone has their own shortbread and gingerbread recipes, but few people have a cheesie recipe. In any case, one taste seems to be enough to induce desperate recipe requests for most people. The cheesies make a nice contrast to all the sweet cookies because they are a savoury cookie that goes well with other appetizers.


Cheesies


Dad's Cheesies

Cream together until fluffy:
1/4 to 1/2 lb of Imperial Sharp Cheddar, softened
1/2 lb butter, room temperature


Cheesies Step 1


Work in:
1 1/2 to 1 3/4 cup white, all-purpose flour
1/2 tsp Lea & Perrins Worcestershire Sauce
1/2 tsp Tabasco Sauce


Cheesies Step 2


Stir in 4 to 4 1/2 cups Rice Krispies. This makes a very dry mix that you have to squash together and it will still make lots of crumbly bits.

Put tablespoon blobs on a lined cookie sheet and flatten with a fork. I usually just do this part by hand because it's so sticky and crumbly that it's just easier. Bake everything immediately rather than let the dough sit around so that the cereal stays crisp.


Cheesies Step 3


Bake at 350°F for 12-15 mins (or at 180°C for about 10 mins in a convection oven) until slightly browned.


Cheesies Step 4


These cookies are pretty fast and easy to make. They disappear quickly too. The one finicky thing is that they really do require the Imperial Cheddar Cheese. It's extra sharp and it's been processed into a form that blends properly with the butter. You could try microplaning (not just grating) extra-old cheddar, but it would probably take forever to get the required amount and I'm not sure it would work that well. I specially brought a container back from our visit to Montreal and saved it to make these cookies.


Imperial Sharp Cheddar Cheese


There is also some debate in my family whether to use a half container or a whole container of the cheese. I usually opt for the half container because I think they're just as yummy and that way, I have enough for two batches!


Photographs and artwork by Allison Gryski. © All rights reserved.

19 December 2010

Recipe: Shortbread Cookies

As promised, I'm sharing all three of my family's traditional Christmas cookie recipes. First was the Gingerbread Cookies (I updated the tips after some discussion with my sister in the comments). Still to come are the Cheesies. Today is my Mom's whipped shortbread. Her shortbread has mostly ruined me for any other shortbread because her recipe produces such lovely, tender cookies.


Shortbread Cookies


I've never had any problem making these before, but it figures that the year I'm trying to take pictures and write it up... things go horribly wrong. Baking overseas is sometimes quite a challenge as ingredients are ever so slightly different and I'm still learning the quirks of this oven. Fortunately, a quick online chat with my Mom helped me rescue them. At least this way I can also tell you how to avoid or fix a similar issue!

Mom's Best Shortbread

1 lb (500g) softened butter
3 c flour
1 c icing sugar
1/2 c cornstarch

Make sure your butter is soft (but not melty!) and then whip it in a mix master until it's really creamy. Add the cornstarch and icing sugar while beating. Make sure you've got your mixer on a low speed and add slowly, otherwise it tosses up a lot of fine powder. (My cheapie handheld beaters have 10 speeds - super fast to rocket launcher --- erg!) You'll probably need to stop and scrape out the beaters a few times as they get clogged up with butter.


Shortbread Dough in progress


Then beat in the flour until the mixer can't handle it. Gently work in the rest with a wooden spoon. It will probably look something like this (though since my issue this year was not enough flour, yours might look more dry):


Shortbread Dough


Allow the dough to "rest" in the fridge for only one hour.

Roll the dough out to 1/4 inch thickness and cut shapes. You can also spoon onto a baking sheet (and press with a fork or fancy-bottomed glass) if you're in a hurry or just testing. For the spoon method, use 3/4 to 1 inch circles, spaced an inch or two apart.


Shortbread before baking


Bake at 375-400° F for 8-10 minutes (or 180° C in a convection oven for about 10 minutes).

Cool slightly before removing from cookie sheet and store in an airtight tin. They taste better after ageing for at least one week, if you can wait that long.


Shortbread After Baking


The above photo is what your cookies should look like after coming out of the oven. Here's what my first tray looked like this year:


Shortbread Oops


Eep! I had a bit of a meltdown myself when I saw that. I'd never had them not work and being pregnant seems to result in such minor disasters feeling extra traumatic. But don't despair if this happens! Get a hug from your sweetie, and read the tips below!

Secret tips
  • The chilling in the fridge for just an hour is really important. If you skip it, the butter will be too warm and make the dough too soft to work with easily. If you leave it too long, it will get too hard.
  • As with pastry, minimize how much you handle the dough or it can become tough.
  • To avoid any baking disasters, you can do a small tester cookie before chilling. I've never done this before but it might be wise if you're trying them for the first time (or in a new country with a strange oven)!
  • These cookies are very rich, so I recommend more smaller shapes. Fancy cut-outs like I do with the gingerbread are harder to achieve without the cookies breaking as they're very tender.
  • If your cookies melt out of shape, you've not got enough flour. My Mom said she once accidentally was using a half-cup measure as though it was a cup. My problem seemed to be extra fluffy flour (which worked well for the gingerbread!), so I just didn't get enough. Using a pastry cutter, carefully work in an extra 1/2 to 1 cup of flour and do a tester cookie. (You don't need to do any more fridge time with your dough.) My remaining dough worked fine once I'd added another cup of flour, so my final flour weight was probably around: 615 - 630g. (This is just estimating after the fact by weighing a cup of flour, so don't worry too much about the exact weight).
  • Let your cookies cool a little before you try removing them from the baking tray. I find it easiest to bake them on parchment paper and then just slide the whole paper off the tray.

These cookies are lots of fun to decorate. Traditionally, using clear corn syrup as "glue", we decorated them with assorted sprinkles. This is especially fun if you've cut out tree shapes! This year, I went for a simpler route of dipping some in chocolate. While I was at it, I also dipped some candied orange peel, candied ginger, and dried apricots. Yum!


Chocolate-dipped shortbread


Photographs and artwork by Allison Gryski. © All rights reserved.

13 December 2010

Recipe: Gingerbread Cookies

At Christmas time, there are three types of cookies my family always has. Other treats come and go, but the cookies are a constant: gingerbread, shortbread, and cheesies. I am often asked for the recipes, so I thought I'd share them here. Today, I let you in on the secrets of my gingerbread cookies.


Gingerbread cookies


This recipe was the one my Grandfather used to make and the one my Mom always makes. Now it's become my gingerbread cookie recipe too. I grew up with gingerbread people and lots of different animal shapes. My tradition, when I bake them, is lots stars and hearts and ruffled circles with other tiny shapes cut out. I bought a set of super tiny cutters this year to have even more fun cutting out fancy shapes from the bigger cookies. There's a spice shop in the Albert Cuyp market that has tons of super fresh spices and other kitchen odds and ends. I found a little tin of 12 tiny cookie cutter shapes for just a few euros. Much fancy cookie fun was subsequently had!


Gingerbread batter


Grandfather's Gingerbread Men

(this is the doubled version, you can safely halve this recipe)

5 1/2 c white flour
1 Tbsp baking powder
1/2 tsp salt
2-3 tsp ginger
2-3 tsp cinnamon
1/2 tsp cloves
1 Tbsp unsweetened cocoa powder

1 1/3 c molasses
2/3 c sugar (technically not a "wet" ingredient, but it goes in with them)
1 c butter, melted
2 large eggs

Combine dry ingredients (while melted butter is cooling). Mix wet ingredients thoroughly, including egg at end. Combine all together and mix evenly to moisten.


Gingerbread batter resting


Chill in plastic bag 2 hours or overnight (allow several hours to warm up if in fridge overnight). Roll out and cut. Bake at 375° F for 10-12 minutes (or at 175° C for 8-10 minutes) on a floured (or parchment paper lined) cookie sheet.


Gingerbread dough


That's the basic recipe, but I'll let you in on the tricks I've learned from my Mom over the years.


Gingerbread dough with shapes


Secret tips
  • Let the eggs warm up to room temperature by whisking them up in a bowl and leaving to sit out.
  • Put the molasses in with the butter and melt slowly in the microwave. The molasses will be much easier to mix this way (but make sure you do it in increments, stirring in between so you don't scorch it). Let it cool a bit before mixing in with the eggs.
  • Make sure your flour isn't too densely packed. I estimate that I used about 840-860g. You can try leaving out half a cup until you see if it's coming together. If you add too much flour, it will be annoyingly crumbly and hard to pack into a ball or roll out.
  • Possibly the most important trick: don't chill the dough in the fridge unless you're not making the cookies until the next day. If it's too cold when you try to roll it out, it will go all crumbly and hard to work with. I just leave it to rest in a bag on the counter for a few hours.
  • Unless you have lots of counter space, only try to roll out half the dough at a time. Put the other half in the bag somewhere cooler since the dough will start to get really warm and too soft to handle once the oven is running.
  • These gingerbread cookies have the perfect blend of softness and crispiness. This does mean you shouldn't try to make a gingerbread house with them, which requires a completely crisp cookie.
Gingerbread cookies cooling
Happy Baking! Photographs and artwork by Allison Gryski. © All rights reserved.

26 November 2010

Cranberry-Chocolate Christmas Muffins


Cranberry Christmas Muffins


These are the bran muffins of my youth with a yummy seasonal modification. My Mom usually made them with pieces of date in the middle. My version has cranberries and chocolate chips. Something about cranberries and chocolate just says "Christmas" to me, even though it's still a month away... well, at least here in Holland I have the excuse that they celebrate the tradition of Sinterklaas on December 5.

Cranberry-Chocolate Christmas Muffins

Makes about 24 muffins.

In a medium pot, cover the fresh cranberries with water and then simmer just until the skins pop. I used a whole bag (340g) of cranberries for one batch. Drain and set aside.

In a large bowl, mix all the dry ingredients together:
  • 2 cups each bran, whole wheat flour
  • 1 cup each wheat germ, sugar, chocolate chips
  • 1 Tbsp each cinnamon, baking powder
  • 2 tsp salt

Then make a well in the middle and pour in the wet ingredients:
  • 1 cup oil (apparently my Mom now uses buttermilk instead, but I've not tried it)
  • 2 cups milk
  • 3 eggs (or 2 plus other dairy like yogourt, sour cream, etc)
  • 2 tsp vanilla (totally optional)

As you're mixing it together, add some molasses to taste -- I usually do a big "glurb" (super accurate technical baking term there!). Once it's mostly mixed, add the cranberries and carefully mix them in.

Bake at 375°F for 35-40 mins in a conventional oven or, 180°C for 25 mins in a (small) convection oven. Remove from the pan immediately to cool. These muffins freeze well.


Holiday Muffins
Photographs and artwork by Allison Gryski. © All rights reserved.