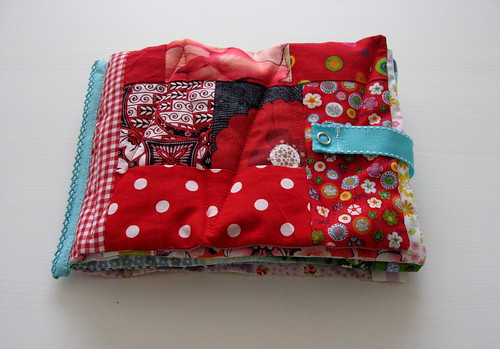
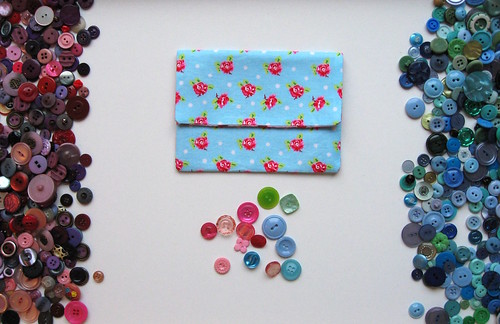
Showing posts with label tutorial. Show all posts

20 August 2013

Tutorial: How to make simple bead bracelets (with a toddler)


Pony bead bracelet

The Wee Lass and I recently spent a fascinating (to use her word) afternoon making some bead string jewellery. Our method is easy for a toddler to do nearly independently. Given the small size of the beads, use your common sense if your child is ready to do an activity like this or not. Share pictures of your creations in my flickr group.

Materials:
-cord elastic
-plastic "pony" beads
-small dish or container for the beads

Of course you can make bead bracelets with just about any string-like material and anything with a hole in it (macaroni necklaces are a classic!), but these materials are easy and appealing to use. The cord elastic is stiffer than twine, yarn, or string, meaning it's easier to thread a bead onto and because it's stretchy, you won't need any fasteners.

"Pony" beads come in a variety of fun colours, they are inexpensive, and they have large holes, making them easy for a toddler to thread onto the cord.


Step 1: Measure
Measure a length of the elastic that fits appropriately for a bracelet or necklace, then add a couple inches extra for tying it together at the end. It's better to have it a bit too long and trim the excess after you tie the knot than to struggle with tying it off.


Step 2: Set it up
Tie a slip knot in one end, using up at least 1 inch. You want to "save" some of the elastic so you have some free to tie it up with at the end. I also put a safety pin through the elastic by the knot to ensure no beads can slip off.


Step 3: Hand it over
At this point, it's ready for your small person to start stringing beads.


If they're doing a long string, you might add a safety pin part way through the beading process to ensure the beads already on won't slip off if they pick it up from the wrong end. I think losing some beads is inevitable. The Wee Lass was pretty zen about re-doing her work, but I can imagine some toddlers might have a meltdown if they dump off their whole string by accident. Just pin through the fabric elastic casing near the current top bead.


Step 4: Tie it up
Once they get to about an inch or two from the end, it's time to tie it off. Undo the slip knot in the bottom of the string and remove any safety pins. Holding the two ends together, stretch the elastic a bit and tie a knot as close as you can to the beads. Double check the size and then snip off the tails if they're too long.


bracelet and necklace by The Wee Lass


Photographs and artwork by Allison Gryski. © All rights reserved.

16 November 2012

Tutorial: Fabric Bunting


Fabric Bunting

I made some bunting not too long ago and took pictures of the process. So here is a tutorial for how to sew some for yourself. It's pretty, it's easy, and it's great if you have lots of small bits of fabric from other projects that need using up.

Materials:
-assorted fabrics
-bias tape
-pinking shears
-piece of scrap cardstock or paper

Step 1: Make a flag template

I made a template to trace out of some scrap cardstock I had laying about. Don't forget to include seam allowance (1/4" on each side).


Bunting Flag Template

I used the following method: Draw a line of the width of the flag. Find the middle and draw a line down for the length, forming a T. Draw lines connecting the ends of your lines to make your triangle shape. Of course, you don't need to limit yourself to triangles. Scallops or squares are also fun.

Step 2: Cut out your flags


Cutting out Bunting Flag

Cut out pairs of triangles in a variety of fabrics. You can either trace the template onto fabric with a washable fabric marking pen or pencil or cut around it carefully, like I did.


Step 3: Sew each flag


Turning the Flag

Sew each flag with 2 pieces with right-sides together, leaving the top edge open. Trim your seam allowance with pinking shears to make it less bulky. Then flip it right side out, using a blunt knitting needle (or similar object) to poke the point out. The raw top edge will be hidden when you attach it to the bias tape.


Bunting Flags

For beginners, you turn at the point as follows: stop sewing with the needle down through the fabric, then lift up the presser foot and rotate the flag, then put the presser foot back down and continue sewing.

Alternately, you can sew your flags right sides facing out and then edge with decorative bias tape, or trim with pinking shears or do a zig-zag stitch to prevent fraying.

Step 4: Attach your flags to bias tape


Attach flag to bias tape

Pin your flags inside the fold of the bias tape, then sew along the open edge of the tape to attach the flags.

Step 5: Hang your bunting

Ta-dah! Here's my bunting hanging in our living room. If you make some bunting following this tutorial, please share your pictures in my flickr group!


Fabric Bunting


Photographs and artwork by Allison Gryski. © All rights reserved.

18 February 2012

Tutorial: How to Sew a Stuffed Carrot Toy

There's a bunny who's been looking for a carrot, so I rooted around my fabric stash and this is the result. I had no plain orange fabric, but I love the "heirloom variety" carrot that resulted with this patterned fabric.


Bunny and Carrot


If you'd like to make a carrot of your own, then you will need...

Materials
-felt (for the leaves)
-fabric (for the carrot)
-some stuffing
-paper (to make a pattern)


Carrot Materials


Step 1: Cut the carrot out

First you need to make your pattern. Draw a carrot shape. Then add some seam allowance by tracing around it a bit larger (however much you want to make your seams). Then draw the leaves. They don't need seam allowance since they'll be made out of felt. This part really doesn't need to be that precise. Cut out your pattern and pin to your fabric or trace with a fabric marking pen and cut out. Cut out 2 matching carrot pieces and however many leaves you like. I cut 3 leaf pieces. Mine match, but there's no reason they need to be identical.


Carrot Pieces


Step 2: Pin and sew the carrot together

Pin the carrot right sides together with the leaves tucked inside. I always have the wrong instinct to have bits like the leaves sticking out, but then when you flip it, they'd be on the inside. So make sure your leaves are tucked in and be careful to keep all but the stem away from the edges so that you don't catch extra bits when sewing.


Pinning and Sewing the Carrot


Sew around the carrot, leaving a gap of at least an inch on one side for turning it right side out. I sewed back and forth over the leaves a few times to make sure all three were well secured.

Step 3: Flip and iron the carrot

Flip your carrot right side out and iron it flat, making sure to iron in the edges of the opening. This makes it easier to sew up later.


The Unstuffed Carrot


Step 4: Stuffing and finishing the carrot


The Stuffed Carrot


Now stuff in lots of filling. Sew up the gap using a ladder stitch.

Voila! The Finished Carrot Toy!

If you make a carrot toy following this tutorial, I'd love to see it! Please add your pictures to my flickr group.


The Finished Carrot

Photographs and artwork by Allison Gryski. © All rights reserved.

01 October 2011

Tutorial: Sew a Tag Square Baby Toy


Tag Square


The ribbon for the snap closure on the fabric scrap book is the Wee Lass's favourite bit to chew, so I thought I'd make a snap-free tag square toy. Before I had a little one, I'd have wondered how this scrap of fabric and trims could be interesting, but really, anything with bits to hold and that she can put in her mouth is currently a popular toy. Conveniently, it's a project you can finish during a single naptime.

Materials:
  • 2 same-size squares of fabric
  • Assorted trims, ribbons, or strips of fabric
  • Some polyester filling


Tag Square Materials


Step 1: Design and Pin your Tag Square


Tag Square Step 1


Cut various lengths of trim, ribbon, or strips of fabric to form your tags. If you're using strips of fabric, you'll need to finish the raw edges somehow so that they don't fray during the no-doubt-frequent washings (or sew little tubes so the raw edge is inside). Fold each tag in half (with the right side facing out), and pin in between your two squares of fabric (with right sides of fabric together). I did 3 tags per side. Leave a good bit of space near the corners to account for the seam allowance and don't pin the tag(s) in the middle of one side, so that you have a gap for flipping the whole thing right side out.


Step 2: Sew Tag Square Together


Tag Square Step 2


Sew around your tag square, leaving a good gap for turning. Strongly backstitch on either side of this space. I also backstitched over each tag, to ensure that they were extra secure. When you're finished sewing, turn your square the right side out, and iron it flat.

Step 3: Filling your Tag Square


Tag Square Step 3


Now you need to stuff your square. Take a small bit of filling and stretch it out thinly until it's nearly the size of your square. Then stuff it inside and spread it out.

Step 4: Finishing your Tag Square


Tag Square Step 4


Now pin the tag(s) that you left off from your gap for turning, and sew them to one side of the opening. Now that they're fixed in place, quilt your square. This will hold the batting in place. Make sure that you run at least one line of stitching down along the opening to close it up. I used a square spiral pattern, working from the middle out.

That's it! I wondered whether it was worth writing a tutorial for this at all since it's super simple, but I figure that beginners, tired new parents, or parents-to-be might find it helpful. If you make a tag square baby toy inspired by this tutorial, I'd love to see it! Please add your pictures to my flickr group.


Tag Square Baby Toy


Photographs and artwork by Allison Gryski. © All rights reserved.

28 September 2011

Tutorial: How to Sew a Scrap Fabric Baby Book


Rainbow Scrap Fabric Baby Book

Books, like all other objects, are for eating, according to the Wee Lass. Since I'm not that keen on her tasting and nibbling her board and paper books, I thought I'd make her a fabric one. This is a great project for all those tiny scraps in your stash. I went with a rainbow theme, but it would be fun to make an I-spy book with lots of animals and objects to find. I also just did totally random scrappy blocks, but if you have more time, you could make it a fancy block sampler.

Materials:
  • Lots of scrappy bits of fabric
  • Some polyester filling or scraps of quilt batting
  • Some double-fold bias tape for binding
  • Some ribbon, a bit of interfacing, a snap (optional)


Scrap Fabric Mess


Step 1: Sew some patchwork blocks

First up, you need to make the pages of your book. I would recommend making 6-10 blocks, for a book with 3-5 pages. The one I made has 5 pages (red and pink covers, pink/orange spread, yellow/green spread, green/blue spread, and blue/purple spread).


Fabric Book Pages


Select your scraps and sew some together. I always backstitch at the start and end to secure the stitching. I did not do any planning or fussy cutting. I just sewed bits together, ironed seams to one side, then trimmed off excess and added another strip where necessary. Once it looked good, I stopped. You could certainly be more methodical and it would involve less futzing at the end. To make them the same size, I added a few strips here and there and then I picked the smallest of my squares and used it as a template to trim the others to match.

Step 2: Sewing your pages


Fabric Book Step 2


Now that you have a stack of blocks (all the same size) pick an order for the blocks. The first and last block will form the front and back covers. Pair your blocks up into the pages and pin them right sides together. Make sure you've got them facing the way you want and decide which edge will go in the binding (you won't be sewing along that edge until later). (If you want a closure, read step 2b now.) Sew each page around 3 sides, leaving the binding edge open. Then flip it right side out. I find a blunt knitting needle helps poke the corners out well. Iron it flat.

Step 2b: Adding ribbon for a closure (Optional)


Fabric Book Step 2b


If you want to add a snap or tie-ribbon closure, you'll need to pin that inside the cover. You can either do a single ribbon with a snap on the front like I did, or two ribbons that tie the book closed. The snap was probably a strategic error on my part as the Wee Lass loves chewing on the strap (it's easy to grasp) and I'm less keen on the metal snap in her mouth. If you want to have tie ribbons, just put a length of ribbon inside the seam (with ribbon in between the right-sides) that will be the outside edge of the front and back cover pages. For the snap closure, put the ribbon just on the back cover. I suggest a heavier, grosgrain ribbon, like I used to withstand pull of the snap.

Step 3a: Adding snap for closure (Optional)
Before you stuff and quilt your front cover, you need to add the snap. You need to do it now unless you want the back of the snap to show on the first page of the book. I preferred to have it hidden inside. I think it's wise to iron a scrap of interfacing on the inside where the snap will be attached to strengthen the fabric. Add your snap according to the directions on the snap package. The upper part should go on the ribbon, the lower part on the front cover.

Step 3: Stuffing and Quilting your pages


Fabric Book Step 3


Now stuff your pages with some batting or polyester fibre filling. If you're using the latter, pull it out until it's quite thin or your book will be super poofy and hard to bind. Tuck the batting inside the page and spread it out. Leave a good gap on the binding side with NO filling, or again, your book will be hard to bind. I'd suggest about twice your seam allowance. I only left the seam allowance empty and it wasn't enough, so thus speaks the voice of experience. Now you need to quilt the page. I did square spirals (start in the middle and work outwards) and giant zig-zags. Whatever pattern you chose, make sure that you run a line down by the empty part at the binding edge to hold the stuffing in.

Step 4: Binding your book


Fabric Book Step 4


Once you have quilted all your pages, pin them together at the binding side. I suggest you sew them together at this point, to make adding the binding easier since the pages will already be fixed.


Fabric Book Step 4 cont'd


Once you've done that, pin the bias tape along the binding, folding the raw ends inside. You might find it easier to iron them in once you've measured the length you need and then pin it. At this point, if you left a generous seam allowance empty of filling, you should be able to just sew the binding on. If, like me, you're finding it quite snug and worried that you'll miss catching it on the underside, handstitch it on first, then zig-zag it to make it secure.


Front and Back


This project is a good one for the busy mama as you can just fling together a few scraps when you have a free moment and not worry about precise measuring and cutting. That's my least favourite bit of quilting, but I know some people love it, so if that's you, ignore me, and make some fiddly quilt blocks for your book! The book has been officially approved by the Wee Lass as delicious. If you make a fabric book inspired by this tutorial, I'd love to see it! Please add your pictures to my flickr group.


My book


Photographs and artwork by Allison Gryski. © All rights reserved.

07 February 2011

Guest Post: The Plain White T-Shirt Necklace

Today's special guest post is by Nicole Longstreath, one of my fellow bloggers at The S.W.A.P. Team. We've swapped blogs for a day, so read on for her tutorial on how to make a fabulous fashionable accessory out of a plain white t-shirt.


Upcycled T-shirt Necklace


In late December, I made a 2011 resolution to consume less. I was inspired by the collaborative consumption movement and a desire to focus on life and not stuff. So when I heard people were taking their unwanted T-shirts and turning them into trendy necklace-scarves, I couldn't be more inspired. Tons of throw-away clothing like this ends up in landfills - what better way to encourage people to explore their inner DIY fashionista using existing materials?

In the age of YouTube, a variety of tutorials are only a click away, so I did a Google search for "T-shirt necklace" and it yielded quite a few results. If I was looking for elaborately-crafted T-shirt necklaces, I had found it.

There were braided ones, fringy ones and beaded ones. Ones which looked like flowery lady-bibs and others which were a rainbow of high-brow gray. Some had feathers, half had rosettes but none looked like something I would care to create or even wear. They were gorgeous art projects and I admired the re-purposeful spirit, but most of them just weren't appropriate for me.

I wanted to make one of these T-shirt necklaces, but I didn't want it to be a DIY disaster and I wanted to be able to actually wear it and maybe even get a few compliments. So I decided to find a good white T-shirt and make a new classic, The Plain White T-Shirt Necklace.

Here's how it's done:
  1. Find an unwanted but good-quality, heavy-weight T-shirt in white - the kind with no seams down the sides. Cut main body of T-shirt into 1-inch strips.

  2. T-shirt in pieces
  3. Save one strip and snip it open to create one long strip. Set aside.
  4. Stretch out all the loops. Leave a little bit of slack or bounce so they don't look totally stretched out.
  5. Make figure-8 with a strip, fold in half and slip both loops around your head. Adjust to the longest length at the bottom but note where the smaller loop is on your chest.
  6. You've just made your guide; these are the highest and lowest points of the necklace, so just keep making figure-8s and adjust to fill in. I would recommend alternating placement of each loop so you don't end up with a “stack” effect.
  7. Carefully take off the necklace you just created by placing your fingers around the point of the necklace which is on the back of your neck. Keep your fingers wrapped around that section.  This is the “back” of your necklace.
  8. Take the loop you set aside and wind it around the back of your necklace, creating a 1 1/2” wrap around the bunch of loops, but leaving a small amount to tie up with once you can wind no more.

  9. Tying the T-shirt Necklace
  10. Wear with jeans, tank top and a light cardigan. Wait for the compliments to come in.

There you have it - you're very own, practical Plain White T-shirt necklace. Cool enough to impress, but grown-up enough to wear with a straight face.


Upcycled T-shirt Necklace


Thanks Nicole! Over at In the Loupe, her blog about social responsibility, you can check out my post on 5 Ways to Afford Ethical Shopping.
Photographs and text by Nicole Longstreath. © All rights reserved.

01 February 2011

Tutorial: How to Sew a Pocket Purse


Pocket Purses


Little button or snap closure pocket purses are endlessly useful. You can tuck a few important things in that you don't want lost at the bottom of a larger bag, use them to store jewellery when travelling, use them for keeping crafty odds and ends tidy, or for any number of other things. You could even use it as a small clutch purse on its own. I've been teaching a friend of mine to sew and she mentioned a desire to make something like this, so I said I'd write a tutorial for one and then we could sew it together.

These are pretty quick to make (if you're not taking photos of every single step) and I probably spend nearly as much time dithering over the button choice as I do actually sewing!

Materials:
  • 1 piece outer fabric (6.5 inches x 12 inches)
  • 1 piece lining fabric (6.5 inches x 12 inches)
  • 1 piece heavyweight interfacing (6 inches x 11.5 inches)
  • 1 button (or snap)

The finished purse is approximately 6 inches by 4.5 inches and it uses 1/4 inch seams throughout.


Pocket Purse Materials


A note on adjusting the size:
You can easily make this purse smaller or larger if you have something specific you want to store in it. Just adjust the initial size of the rectangles, and make sure the interfacing does not include the seam allowance. If you want finished dimensions of W (width) x H (height), cut out your fabric in rectangles of W + 0.5" by (H x 2 + H/2) + 0.5". This should make a pocket purse with a flap that's half the finished height. So, if you want to make a pocket that's 8 x 4 inches (with a 2 inch flap), you would cut your fabric in 8.5" x 10.5" rectangles.


Step 1: Iron interfacing to outer fabric


Interfacing


Iron your interfacing to the wrong side of your outer fabric, leaving 1/4 inch seam allowance on all sides.


Step 2: Sew pocket with outer fabric


Sew outer pocket


With right side facing up, fold the bottom edge of your outer fabric up, so that right sides will be together. The doubled portion should be 4 1/2 inches high, leaving 3 inches showing for the flap. If you want your flap longer or shorter, you can adjust it at this point. Pin the fabric in place and sew up each side of the doubled fabric, leaving the top 1/4 inch free (so just sew alongside the interfacing). Always back stitch at the start and end to secure your sewing.


Step 3: Sew pocket with lining fabric


Sew lining pocket


Repeat Step 2, with the lining fabric. You may want to mark a point 1/4 inch before the end of the doubled fabric since you won't have the interfacing to guide you where to stop. After sewing, snip the bottom corners with pinking shears and iron the seam open, facing in (i.e. just the top part of the seam allowance gets ironed towards the middle, so that it overlaps the pocket).


Finished lining pocket


Step 4: Insert lining


Insert lining


Flip the lining right side out (optionally iron the seams crisp) and tuck it inside the outer fabric. The right sides of your two fabrics should be together. Pin them together, paying special attention to the start of the flap, since the lining fabric will want to curl inwards.


Step 5: Sew across pocket


sew across pocket


Sew the outer fabric to the lining, across the top of the pocket. Just sew alongside the interfacing, making sure that you're only sewing the top two layers. A free-arm sewing machine makes this easiest.


sewing across pocket


Step 6: Sew around flap, leaving opening for turning


move pins to back


Now you're going to sew around the flap, leaving a 3 inch gap in the middle for turning. I found it easiest to flip the pocket over, moving the pins to that side, and to sew following the interfacing. Make an extra strong back stitch on either side of the gap so it can withstand the strain of turning. Be sure to sew all the way down to meet the seams along the lower portion of the sides. Try not to catch the edge of the pocket seam allowance like I did (but don't worry if you do as it will be hidden when the purse is flipped right side out).


sew flap, leave gap


Step 7: Trim and iron


Trim and iron


Trim the corners of the purse with pinking shears and iron back the seam allowance along the top of the flap. This will make hand-sewing the opening easier. (If you plan to use a snap rather than button, I recommend that you iron on a scrap bit of interfacing to the lining on the part of the flap where the snap will go. This will help prevent the snap from pulling too much at the fabric.)


Step 8: Flip purse and sew up opening


Flip right side out


Using the gap that you left un-sewn, flip the purse right-side out. (It will look a bit like a strange hand-puppet until you tuck the lining inside the outer fabric to create your pocket.) Using a ladder stitch, hand sew the opening in the flap closed. Fold the flap down and iron to crease.


Pocket Purse before button


Step 9: Add button or snap


Choosing a button


Choose a button (fun, but takes me forever!) and decide where you'd like it placed. Mark discreetly with a fabric pencil and sew a buttonhole in the flap. I always do a tester on scrap fabric first! Hand sew your button in the appropriate place on the pocket. Alternately, you can attach a snap instead of a button, following the directions on the package of snaps.


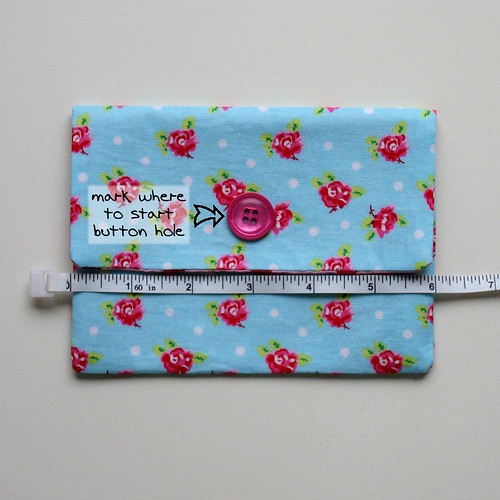
Mark button placement


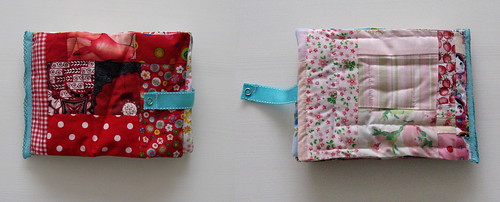
If all has gone well, you should now have a cute little pocket purse, ready for all your bits and pieces!

If you make a pocket purse following this tutorial, I'd love to see it! Please add your pictures to my flickr group.


Finished Pocket Purse


Photographs and artwork by Allison Gryski. © All rights reserved.