31 December 2010

As the old year passes

The last day of the year is a good day to review and think over the previous year and imagine what's to come in the next. This year was full of exciting change (moving overseas) and travel (lots). I was in 10 different cities this year: Montreal, Toronto, Amsterdam, Brussels, Pisa, Siena, San Gimignano, Rome, Paris, and London! There was so much new to see that I'm still uploading some of our holiday pictures. Much of this year has also been spent expecting our Bun. That will pretty much guarantee that next year will be filled with exciting changes too, once Bun arrives in the spring.


Moodboard Review


I also took a little visit to the archives of my blog and saw my mood board for our apartment. I wanted to review how our apartment came together, so I searched through photos I'd taken of our home throughout the year and put together this collage, with the original moodboard in the middle. I think I was pretty successful and I'd definitely use a moodboard like this again.

Once I'd done that, I couldn't resist making a little "calendar" of the year, with a couple photos from each month.

January


February


March


April


May


June


July


August


September


October


November


December


It's been a lovely year and I hope yours has been too! Best wishes to all for a Happy 2011!


Photographs and artwork by Allison Gryski. © All rights reserved.

22 December 2010

Handmades for the Christmas Tree


Candy Cane Garland


Just in time for tree-decorating on the solstice, I finished beading my candy cane garland yesterday morning. This year's tree is almost entirely decorated with things made by me. I have a couple more little decorations to finish and add, but this is what our Festive Ficus looked like yesterday afternoon.


Festive Ficus


Photographs and artwork by Allison Gryski. © All rights reserved.

The Sustainable Closet blog series


Accessories Montage


As I mentioned a while ago, I've been blogging for The S.W.A.P. Team every week or two. Lately, I've written a mini series called The Sustainable Closet:

The Sustainable Closet: A Guide to Decluttering your Wardrobe
The Sustainable Closet: My story of Decluttering
The Sustainable Closet: Accessorizing a Minimal Wardrobe

I had a lot of fun playing with different accessories for the most recent article. I'm actually finding that I'm really enjoying my minimal maternity wardrobe at the moment. Everything goes with everything else, and choosing what to wear is so quick when there's only a couple options.

For reference of anyone else planning a small wardrobe, here's the maternity pieces I have:
1 dress, 1 tunic top, 5 tops
1 pr jeans, 1 pr trousers, 1 pr leggings, 1 skirt

I also have a few other tops and a couple extra pairs of jeans that were hand-me-downs from a friend. Fortunately, I love wearing cardigans, so most of my regular sweaters are still wearable. The dress and several of the tops I purchased seem like they may well continue to work in my normal wardrobe just as more gathered or stretchier items.

I think one of the keys for me not minding this restricted set of choices is that everything fits my current style. So no matter what I put on, I feel cute and comfy. My regular wardrobe has a lot of older items that are "just okay" for whatever reason. I've learned a lot from reducing my clothing, both due to moving overseas and now due to maternity clothes. I think I'll try to keep this going when I'm back to my "normal" clothes. It might not be for everyone, but a small wardrobe is definitely for me.

Photographs and artwork by Allison Gryski. © All rights reserved.

21 December 2010

Winter Solstice Greetings


Solstice Bouquet


Wishing you a Bright and Happy Winter Solstice!

Photographs and artwork by Allison Gryski. © All rights reserved.

20 December 2010

Recipe: Cheesies

My Dad's Cheesies are the last of my three classic Christmas cookies (see also Gingerbread Cookies and Shortbread Cookies). They are quite possibly my most-requested recipe ever. I think perhaps because everyone has their own shortbread and gingerbread recipes, but few people have a cheesie recipe. In any case, one taste seems to be enough to induce desperate recipe requests for most people. The cheesies make a nice contrast to all the sweet cookies because they are a savoury cookie that goes well with other appetizers.


Cheesies


Dad's Cheesies

Cream together until fluffy:
1/4 to 1/2 lb of Imperial Sharp Cheddar, softened
1/2 lb butter, room temperature


Cheesies Step 1


Work in:
1 1/2 to 1 3/4 cup white, all-purpose flour
1/2 tsp Lea & Perrins Worcestershire Sauce
1/2 tsp Tabasco Sauce


Cheesies Step 2


Stir in 4 to 4 1/2 cups Rice Krispies. This makes a very dry mix that you have to squash together and it will still make lots of crumbly bits.

Put tablespoon blobs on a lined cookie sheet and flatten with a fork. I usually just do this part by hand because it's so sticky and crumbly that it's just easier. Bake everything immediately rather than let the dough sit around so that the cereal stays crisp.


Cheesies Step 3


Bake at 350°F for 12-15 mins (or at 180°C for about 10 mins in a convection oven) until slightly browned.


Cheesies Step 4


These cookies are pretty fast and easy to make. They disappear quickly too. The one finicky thing is that they really do require the Imperial Cheddar Cheese. It's extra sharp and it's been processed into a form that blends properly with the butter. You could try microplaning (not just grating) extra-old cheddar, but it would probably take forever to get the required amount and I'm not sure it would work that well. I specially brought a container back from our visit to Montreal and saved it to make these cookies.


Imperial Sharp Cheddar Cheese


There is also some debate in my family whether to use a half container or a whole container of the cheese. I usually opt for the half container because I think they're just as yummy and that way, I have enough for two batches!


Photographs and artwork by Allison Gryski. © All rights reserved.

19 December 2010

Recipe: Shortbread Cookies

As promised, I'm sharing all three of my family's traditional Christmas cookie recipes. First was the Gingerbread Cookies (I updated the tips after some discussion with my sister in the comments). Still to come are the Cheesies. Today is my Mom's whipped shortbread. Her shortbread has mostly ruined me for any other shortbread because her recipe produces such lovely, tender cookies.


Shortbread Cookies


I've never had any problem making these before, but it figures that the year I'm trying to take pictures and write it up... things go horribly wrong. Baking overseas is sometimes quite a challenge as ingredients are ever so slightly different and I'm still learning the quirks of this oven. Fortunately, a quick online chat with my Mom helped me rescue them. At least this way I can also tell you how to avoid or fix a similar issue!

Mom's Best Shortbread

1 lb (500g) softened butter
3 c flour
1 c icing sugar
1/2 c cornstarch

Make sure your butter is soft (but not melty!) and then whip it in a mix master until it's really creamy. Add the cornstarch and icing sugar while beating. Make sure you've got your mixer on a low speed and add slowly, otherwise it tosses up a lot of fine powder. (My cheapie handheld beaters have 10 speeds - super fast to rocket launcher --- erg!) You'll probably need to stop and scrape out the beaters a few times as they get clogged up with butter.


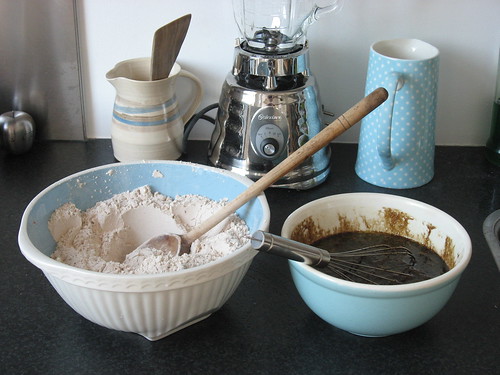
Shortbread Dough in progress


Then beat in the flour until the mixer can't handle it. Gently work in the rest with a wooden spoon. It will probably look something like this (though since my issue this year was not enough flour, yours might look more dry):


Shortbread Dough


Allow the dough to "rest" in the fridge for only one hour.

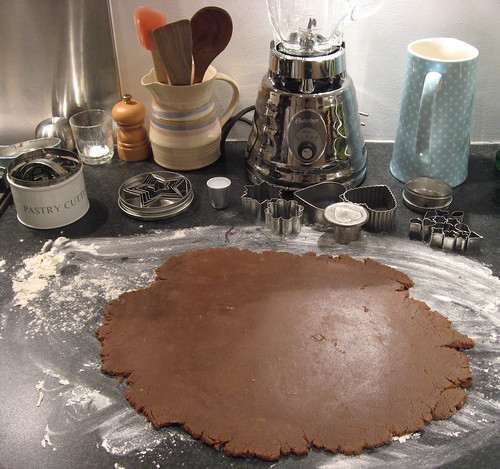
Roll the dough out to 1/4 inch thickness and cut shapes. You can also spoon onto a baking sheet (and press with a fork or fancy-bottomed glass) if you're in a hurry or just testing. For the spoon method, use 3/4 to 1 inch circles, spaced an inch or two apart.


Shortbread before baking


Bake at 375-400° F for 8-10 minutes (or 180° C in a convection oven for about 10 minutes).

Cool slightly before removing from cookie sheet and store in an airtight tin. They taste better after ageing for at least one week, if you can wait that long.


Shortbread After Baking


The above photo is what your cookies should look like after coming out of the oven. Here's what my first tray looked like this year:


Shortbread Oops


Eep! I had a bit of a meltdown myself when I saw that. I'd never had them not work and being pregnant seems to result in such minor disasters feeling extra traumatic. But don't despair if this happens! Get a hug from your sweetie, and read the tips below!

Secret tips
  • The chilling in the fridge for just an hour is really important. If you skip it, the butter will be too warm and make the dough too soft to work with easily. If you leave it too long, it will get too hard.
  • As with pastry, minimize how much you handle the dough or it can become tough.
  • To avoid any baking disasters, you can do a small tester cookie before chilling. I've never done this before but it might be wise if you're trying them for the first time (or in a new country with a strange oven)!
  • These cookies are very rich, so I recommend more smaller shapes. Fancy cut-outs like I do with the gingerbread are harder to achieve without the cookies breaking as they're very tender.
  • If your cookies melt out of shape, you've not got enough flour. My Mom said she once accidentally was using a half-cup measure as though it was a cup. My problem seemed to be extra fluffy flour (which worked well for the gingerbread!), so I just didn't get enough. Using a pastry cutter, carefully work in an extra 1/2 to 1 cup of flour and do a tester cookie. (You don't need to do any more fridge time with your dough.) My remaining dough worked fine once I'd added another cup of flour, so my final flour weight was probably around: 615 - 630g. (This is just estimating after the fact by weighing a cup of flour, so don't worry too much about the exact weight).
  • Let your cookies cool a little before you try removing them from the baking tray. I find it easiest to bake them on parchment paper and then just slide the whole paper off the tray.

These cookies are lots of fun to decorate. Traditionally, using clear corn syrup as "glue", we decorated them with assorted sprinkles. This is especially fun if you've cut out tree shapes! This year, I went for a simpler route of dipping some in chocolate. While I was at it, I also dipped some candied orange peel, candied ginger, and dried apricots. Yum!


Chocolate-dipped shortbread


Photographs and artwork by Allison Gryski. © All rights reserved.

17 December 2010

Snow and Stars


Winter Wonderland


I woke up to a lovely winter fairyland this morning. By the time I was ready to run some errands, it was looking more like this ...


Snowy Day


That photo isn't out of focus -- there's just a white haze from all the big fluffy flakes falling. I was absolutely covered in melting white fluff by the time I got to the grocery store. (Apparently the snow is closing down public transportation ... seems so strange to my Canadian upbringing.) It is so pretty and Christmas-card-like out, though! It has also meant a brighter day, so I took some more pictures of my star garland and stitched them together so you can see the whole thing. (click here to view larger)


Complete Star Garland


In other yarn-related news, the other day I acquired my planned yarn basket when I went to the market. I love having something prettier and more functional that an assortment of plastic bags! Now I've just got to get on with beading my candy cane garland, so that it's ready for tree-decorating on the solstice.


Yarn Basket


Photographs and artwork by Allison Gryski. © All rights reserved.

16 December 2010

Star Garland Ta-dah!


60 stars


Sixty stars later and I'm finished my star garland! I was really hoping for some sunshine today so I could take a nice photo of it. Unfortunately it's all grey and rainy here. It also turned out to be tricky to fit it all in! So these will have to do...


Finished Garland


Finished Garland


If you'd like to make one of your own, I have a few notes on how I made my garland. I used 15 colours of yarn and for each colour, I did one large star with that as the outer colour. For more details on how I made the large stars, see my Colourful Crochet Stars Tutorial.

I also crocheted 3 small stars with each of the colours, for a grand total of 60 stars. Then I attached them to a chain in the following pattern (where s = small star, l = large star): s, l, s, s, s, l, s, s, s, l, ..., s, s, s, l, s
This will leave you with one small star leftover to turn into an ornament.


white star ornament


The way the stars seemed to be attached in the pattern, results in them having a tendency to hang sideways. I found that the little loop near the top of a point was perfect for adding a loop of yarn for the ornaments, but for connecting to the garland, I instead used a space a little lower.


Where to join a small star


Joining in a small star


To attach the large stars, I went under the chain stitches that form a point. I did 12 chain in between the small stars (as per the pattern), but that was too crowded around the large stars, so there's 15 chain on either side of those. I just did a slip stitch to attach the stars and then continued with the chain.


Joining in a large star


All other yarn and pattern notes are included on my star garland project on ravelry.

If you string a star garland following this tutorial, I'd love to see it! Post your pictures to my flickr group.


Photographs and artwork by Allison Gryski. © All rights reserved.

13 December 2010

Recipe: Gingerbread Cookies

At Christmas time, there are three types of cookies my family always has. Other treats come and go, but the cookies are a constant: gingerbread, shortbread, and cheesies. I am often asked for the recipes, so I thought I'd share them here. Today, I let you in on the secrets of my gingerbread cookies.


Gingerbread cookies


This recipe was the one my Grandfather used to make and the one my Mom always makes. Now it's become my gingerbread cookie recipe too. I grew up with gingerbread people and lots of different animal shapes. My tradition, when I bake them, is lots stars and hearts and ruffled circles with other tiny shapes cut out. I bought a set of super tiny cutters this year to have even more fun cutting out fancy shapes from the bigger cookies. There's a spice shop in the Albert Cuyp market that has tons of super fresh spices and other kitchen odds and ends. I found a little tin of 12 tiny cookie cutter shapes for just a few euros. Much fancy cookie fun was subsequently had!


Gingerbread batter


Grandfather's Gingerbread Men

(this is the doubled version, you can safely halve this recipe)

5 1/2 c white flour
1 Tbsp baking powder
1/2 tsp salt
2-3 tsp ginger
2-3 tsp cinnamon
1/2 tsp cloves
1 Tbsp unsweetened cocoa powder

1 1/3 c molasses
2/3 c sugar (technically not a "wet" ingredient, but it goes in with them)
1 c butter, melted
2 large eggs

Combine dry ingredients (while melted butter is cooling). Mix wet ingredients thoroughly, including egg at end. Combine all together and mix evenly to moisten.


Gingerbread batter resting


Chill in plastic bag 2 hours or overnight (allow several hours to warm up if in fridge overnight). Roll out and cut. Bake at 375° F for 10-12 minutes (or at 175° C for 8-10 minutes) on a floured (or parchment paper lined) cookie sheet.


Gingerbread dough


That's the basic recipe, but I'll let you in on the tricks I've learned from my Mom over the years.


Gingerbread dough with shapes


Secret tips
  • Let the eggs warm up to room temperature by whisking them up in a bowl and leaving to sit out.
  • Put the molasses in with the butter and melt slowly in the microwave. The molasses will be much easier to mix this way (but make sure you do it in increments, stirring in between so you don't scorch it). Let it cool a bit before mixing in with the eggs.
  • Make sure your flour isn't too densely packed. I estimate that I used about 840-860g. You can try leaving out half a cup until you see if it's coming together. If you add too much flour, it will be annoyingly crumbly and hard to pack into a ball or roll out.
  • Possibly the most important trick: don't chill the dough in the fridge unless you're not making the cookies until the next day. If it's too cold when you try to roll it out, it will go all crumbly and hard to work with. I just leave it to rest in a bag on the counter for a few hours.
  • Unless you have lots of counter space, only try to roll out half the dough at a time. Put the other half in the bag somewhere cooler since the dough will start to get really warm and too soft to handle once the oven is running.
  • These gingerbread cookies have the perfect blend of softness and crispiness. This does mean you shouldn't try to make a gingerbread house with them, which requires a completely crisp cookie.
Gingerbread cookies cooling
Happy Baking! Photographs and artwork by Allison Gryski. © All rights reserved.

09 December 2010

Colour!


Lovely Colours


Colour makes me absurdly happy. I love seeing colourful displays of art supplies. Picking out favourites and making arrangements of colours gives me a silly high. I guess it's being a visual person, but sometimes I think it's not normal how excited I get by stack of colourful yarn, fabric, or pencil crayons. (And then I read blogs by other yarn and fabric fanatics and know I'm not alone in my nuttiness).


Pots of Pencils


When I go into an art store, I love looking through the displays of pencil crayons. Pens and paints are also fun to choose, but it's the pencil crayons that always get me most giddy. At the yarn store I love seeing a wall full of luscious colours. Same thing at the fabric store. I'm especially keen on quilting stores where the goodies are arrayed by colour instead of type. Oh and buttons too, of course.


blue button square


Yup, organize a bunch of artsy crafty supplies by colour and I go a bit bananas. That visual stimulation is something I like in small doses in my home, so my current style favours a lot of plain white walls and furniture with my favourite colours introduced through textiles like quilts and cushions. Things I can have the fun of making!


Stacks of Fabric


I love arranging tidy stacks of fabric and pots of colour coordinated pencil crayons. But until recently, I never had too many colours of yarn before. My star garland project changed that and wow was it fun to sit by the shelf of yarn and pick out a rainbow of colours. It was hard to stop. It's been similarly hard to stop crocheting the stars as I keep getting to dip into my stash of yarn to pick out a new colour.


Rainbow Stars


Photographs and artwork by Allison Gryski. © All rights reserved.