17 December 2008

Cube Unit 540: before and after


before and after
Originally uploaded by allisongryski

Here's a little before-and-after montage. Click through for the description on flickr.

Cube Unit 540: an update


cube unit 540 (after)
Originally uploaded by allisongryski

So I'm sure you're all wondering what happened to my workspace redesign. Well I keep procrastinating on assembling my fira chest and I was wanting to hold off until I'd done that. But I decided since I'm already enjoying what I've done that some pictures of a partially completed makeover are better than none.


cube unit 540 (after)
Originally uploaded by allisongryski

And I had to do it before all the plants croaked. I just don't have the knack with houseplants. The fern was so unhappy even at home that I've never bothered to lug it into work. The bamboo has been getting a little yellow at the base of the stems, which I think is lack of light, but it is growing. The mystery plant seems content and has even shot up a pale green shoot of some sort.

However, despite the minor issues, some of my lack of finishing is probably because I love what I've done so far. The pictures and lamp made a massive difference and the bamboo and mystery plant do add a nice bit of lively green.


cube unit 540 (after)
Originally uploaded by allisongryski

My sister and I used to make lots of paper snowflakes and I still enjoy making some every year. Last year I made some along with another friend for lainevierge's Christmas tree and this year I made some to hang off my shelf at work.

13 December 2008

The goose is getting fat


gingerbread cookies
Originally uploaded by allisongryski

I love the winter holiday time of year. It's full of happy memories of traditions ... the same baking and decorating, and lots of time with loved ones. I now always try to make the same treats that my family always had when I was small since that's what feels "right". So it's Mom's shortbread cookies (some decorated using corn syrup as the glue for sprinkles), Grandfather's gingerbread men (some decorated with currants), and Dad's cheesies. Then there's homemade cinnamon bread and fruit bread. I might experiment with new things the other 11 months of the year, but in December, it's a necessary ritual to have the same things as always.


gingerbread baking
Originally uploaded by allisongryski

I made some carved rubber stamps to make cards for my friends and family far away, but my outside-work has been so busy I did not do so soon enough to also offer cards in my shop. Next year perhaps. This year I did a holly motif on the cards. Some have the stamped greeting inside and just holly on the outside, some have 3-leaf holly, some just 2-leaf holly. Some have the greeting in green instead of red. Part of the fun is making every card just a little bit different.


xmas card 2008
Originally uploaded by allisongryski

Happy holidays!

01 December 2008

Pink Applesauce


pink applesauce
Originally uploaded by allisongryski


Peel 10 red apples (I used Empire apples since they're grown in Quebec, but you should choose whatever kind you like that's grown near you).

Put all the peels in a small pot and just barely cover with water. Add 3-4 whole star anise, 3-4 cloves, some nutmeg, and some cinnamon (probably about 1/4-1/2 tsp each, but I didn't measure). A cinnamon stick would probably be better if you have one. Add some candied citrus peel (I used probably about 1/4 c). I stopped there, but you can add any other spices you think would go nicely with these sorts of flavours (e.g. allspice, mace, lemon zest). You're basically making an apple broth in this pot, so bring it up to the boil, then turn down and simmer (uncovered, so it reduces). After about 15 minutes, the broth should be a deep red colour and the peels should be sort of faded looking.

Meanwhile, back to the apples. Roughly chop them off the cores. Don't worry about having some big pieces and some small, just do whatever's easiest and fastest for you. Toss these all in a large pot and put a bit of water in the bottom. Don't fill it enough to cover the apples or you'll have to spend forever boiling it down to reduce. Grate in some fresh ginger (about 1/2 - 1 tsp worth). Cover this pot and bring it up to the boil, then simmer. After about 10-15 minutes your apples should be nice and soft. Mash them with a potato masher and pour in the apple broth (strained through a sieve to catch all the peels and whole spices). Mix this all up, then return to boiling and reduce until it's a consistency you like. It will get slightly thicker as it cools.

This makes a delicious snack on its own (cold or re-heated), but also a yummy topping on ice cream, pancakes, mixed into porridge, and so forth.

19 November 2008

Duckies for baby fuzzymitten


for baby fuzzymitten
Originally uploaded by allisongryski


A couple weekends ago was my friend fuzzymitten's baby shower. We made cupcakes and ate cupcakes. We're all looking forward to meeting her little one when he arrives in January. Since babies tend to be a bit messy, I made this padded burp/mess cloth with duckies on one side and blue polkadots on the other (and some towelling sandwiched in between). Sewing together three bulky layers was trickier than I realised (and something I'll have to do on a much larger scale eventually with my quilt), so the first time I unpicked half of it and started over.


duckie stitch
Originally uploaded by allisongryski


I used a special duckie cam that I borrowed from my mom to embroider a row of ducks across the cloth. It's not very obvious unless you look really closely, but the thought was cute.


duckies and dots
Originally uploaded by allisongryski


In any case, I hope it turns out to be useful. So you see, I do manage to get the occasional bit of sewing done. I just hope I just figure out where to find some more reserves of energy to do it more often.

04 November 2008

Cube Unit 540: Picture hanging on flimsy walls

(Part 4 in a series)

3 b&w
Originally uploaded by allisongryski

So I picked the 3 black and white and the first pagoda picture (d) since that was my initial instinct. I got them printed this weekend and "framed" and hung them up today. Since I couldn't possibly hang real frames on my cube's fabric walls, I came up with an ingenious alternative with the help of a salesgirl at the Omer de Serres. I had found some Elite Frameless Frames (the 8x10 for a 5x7 photo size), but wasn't sure how to attach them to my flimsy walls. She suggested some adhesive hangers. And because the Interior Decorating Gods were thinking of me, I got the mistake package that had an extra one in it! Since the end result is not very heavy, I just hung them up with a thumbtack and now I have properly framed looking photos. I promise to post pictures when my whole cube re-do is finished.

I think I'll eventually get the 3 stones and the pagoda picture (f) printed and then I can switch between them for a change every now and then. The observant amongst you will remember that there were actually FIVE pictures shown in my cube layout.

Cube Layout Plan
Originally uploaded by allisongryski

The one above my light, to the right side of my computer, is a picture of my sweetie that I took in Stanley Park when we were in Vancouver in August. It makes me smile every time I glance at it.

30 October 2008

Cube Unit 540: Office supplies and Pictures

(Part 3 in a series)

Through the kind offices (heh.) of a car-enabled friend, i was able to visit
Home Depot and IKEA all in one evening.

My shopping list was:
3 plants (a bamboo, a fern, and something else) from home depot
little cherry blossom lamp from ikea
fira tabletop drawers from ikea
plant holders/saucers as necessary from ikea
basket from ikea

I found just about everything I was looking for, though IKEA was out of the basket that I had in mind. Choosing plants was more tricky than I expected. Not only because home depot employees seem to avoid the plant area like the plague. We ended up commandeering one of the rolling ladders and fetching down the fern ourselves. The potted bamboo they had was rather ugly. Instead, I just bought 3 individual stalks. At home, I tied them together with some jute twine and potted it up myself with some dollar store river pebbles and a pot from IKEA. In retrospect, the third plant I chose wasn't really ideal for where I intended it to go. I wanted something for my shelf and I think I should have chosen an ivy, but I got some other leafy upright plant. I think I will place it by my cupboard instead.

While I've taken a couple things to work (the bamboo and small lamp), transporting the larger items (especially the fern) is not going to be very feasible on the busy morning metro, so I may have to take a taxi.

I still need to select which pictures I want printed and get that done. So here's the potentially fun part of this post. Which of these pictures should I choose? Please vote in the poll in the sidebar!

For the 3 pictures along the back of my cube:
a) 3 b&w (mixed)

3 b&w
Originally uploaded by allisongryski


b) 3 colour (pagodas)

3 pagodas
Originally uploaded by allisongryski


c) 3 colour (stones)

3 stones
Originally uploaded by allisongryski


For the one picture under my shelf (obviously not to duplicate one of the above set):
d)

pagoda d
Originally uploaded by allisongryski


e)

pagoda e
Originally uploaded by allisongryski


f)

pagoda f
Originally uploaded by allisongryski


g)

pagoda g
Originally uploaded by allisongryski

25 October 2008

Cube Unit 540: The Redecoration Plan

(Part 2 in a series)

Cube MoodBoard
Originally uploaded by allisongryski

I love seeing "mood boards" on the design blogs I read occasionally (Making it Lovely, Decor8, sfgirlbybay, etc). I've made one only once before based on some stationery. It's cool how some random pretty item can be used as inspiration, but I wasn't trying to create a specific room for a known space that time.

I thought about somehow covering the ugly puce-yellow-beige fabric walls with something more attractive. But this would be tricky, require quite a lot of fabric, and perhaps not look very professional. So I decided instead to make it work for me.

With a zen sort of theme, I would end up seeing the dull yellow colour more like a grasscloth or bamboo. Adding some plants would add colour and life while still being "neutral" office items. Some containers for messy desk stuff would make my desk prettier AND more efficient. To make it a happy place to sit, nicer lighting and some pictures were the final elements to add.

Obviously, I can't actually get rid of the flurorescent lights, but the ones directly above my desk are off, and I can add a pretty little table lamp to give it a better mood.

Next up, shopping and actually trying to achieve the desired effect ...


Cube Layout Plan
Originally uploaded by allisongryski

24 October 2008

Cube Unit 540: The Harsh Light of Fluorescents

(Part 1 in a series)


Cube Unit 540 (before)
Originally uploaded by allisongryski

One of the downsides of my otherwise pretty cool job is the Dreaded Cubicle. Like most Mega Corps, there is the typical sea of grey and beige cubes. My Cube Unit, Number 540, has two kinds of dull yellow fabric walls, a dark grey metal shelf, and a light grey metal cupboard. Everything I look at is grey, black, or puce and lit by fluorescent lighting. Not exactly the most inspiring surroundings.

Cube Unit 540 (before)
Originally uploaded by allisongryski

If I was coming from another office I probably wouldn't even notice. But the comparison is harsh after my lovely sunny home office with its wooden desk, exposed brick wall and lots of art. And even more so after my soothing pale green studio with funky blue arborite table, door leading onto a balcony, and inspiring bits and pieces.

Cube Unit 540 (before)
Originally uploaded by allisongryski

So I devised a Plan. To redecorate this blahest of blah Cube Units. My goal was to make my workspace soothing and pretty, but still professional and neat looking.

How will I do it? It's a daunting task alright. I'll leave you in suspense until I post the next installment in the series.

10 October 2008

Holiday reflections


me on nat's wedding day
Originally uploaded by allisongryski

The lovely summer holiday that my sweetie and I took in August was mainly to attend the wedding of one of my best friends from high school. It was 5 days of colourful activities and delicious food. We also crammed in a lot of touristing and visiting. We ate at such yummy places, that I was inspired to expand from our Montreal restaurant guide to having a list of our favourites in other places. Afterall, it doesn't get much more fun than Japanese fusion hotdogs from a stand with a huge lineup and a staff of four.


reflections of a city
Originally uploaded by allisongryski


In other news, I've got an injured foot which is going to hinder my plans for sewing over the Thanksgiving long weekend (that's this weekend for the non-Canadians reading this). Alternate crafty plans will have to be made! Maybe I'll try to finish my jolly blue socks or crocheted afghan at long last so I can cast on (with no guilt) the seaweed shawl that I've been planning for ages.

08 October 2008

Life with lunchboxes


my second bento (with snack)
Originally uploaded by allisongryski

Hello again. I haven't forgotten that my blog is here... neglected. In fact, it's been nagging in the back of my mind for days. I am so much more in awe of those who manage to blog regularly on top of fulltime work and actually still have time for the crafty projects to blog about. I'm slowly working into a new routine and my poor quilt has been as neglected as this blog.

The one bit of creativity has been in my lunchbox. My rule for myself was that I was allowed to eat out once a week if I packed my lunch the rest of the time. The goal of this was for a healthy waistline AND pocketbook. So far I've been keeping that up, with a mix of hastily packed leftovers and cute bento lunches.

24 August 2008

Holiday recovery


slowpoke
Originally uploaded by allisongryski

I haven't forgotten about blogging, but several things have contributed to a slow-down. I was in Vancouver for 8 days (where I caught a nasty flu from which I'm still recovering) and there's mountains of luggage and laundry as there always is upon one's return from a holiday. To top it off, tomorrow I start a new fulltime job as a user interface designer.

07 August 2008

A cookbook for Taylor


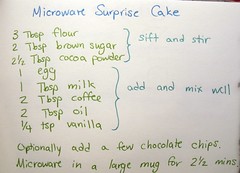
microwave surprise cake
Originally uploaded by allisongryski

One of my amazing girlfriends is moving back to Portland and we are all very sad. I'm going to miss the songs she sings about everything as we're doing it. She definitely lends a wacky sense of fun to every activity. Though there's no way I could match the awesomeness of this going-away present, I wanted to give her something to remind her of us (and why she should come back!).

It all started at our nostalgic sleepover when I had her mix some ingredients in a mug and microwave it. It took less than 5 minutes total and everyone was surprised when I announced that she'd just made a cake! (First tasting cleverly captured on film by lainevierge). She liked the recipe (despite the 
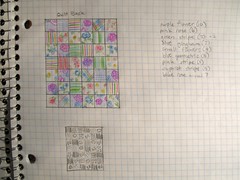
faces she made) and I thought I'd write up a little cookbook in this pretty blank book that she had brought me from her bookbinding class.


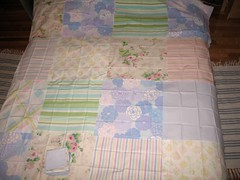
Taylor is a new cook and so I tried to include recipes that are easy, yet delicious. So many beginner-oriented cookbooks have really boring recipes in them and you don't learn anything. I aimed to include breakfast, lunch, supper, and dessert recipes that were all approachable, yet maybe would get you to try a new technique or ingredient or add some new spices to your pantry. Either they have very few ingredients or very simple processes. And almost all of them are happy to be modified with substitutions or additions. A couple of them are family recipes, some are ones I made up at the time I was cooking, and a couple are my versions of recipes that I've used from books or blogs.


My kitchen philosophy is Exactitude only matters in baking and even then not always. If I don't have an ingredient, I just use the most similar thing I do have. If I think something else might taste good, I try it and see. It's hard to make something truly inedible and when you do, it pretty much guarantees you'll never make that particular mistake again. (I once had to throw out a cake-that-wouldn't-bake because I mixed up baking powder with baking soda. And I once had pancakes that weren't working because I was accidentally using icing sugar instead of flour. But I've never made either of those mistakes again. Now if only I could remember that I really don't like cauliflower. When it's all purple and cheap at the market, it looks like fun. But I still have frozen soup in my freezer more than a year later.)


I left the second half of the cookbook blank. In a homemade cookbook, I think it's always nice to have some space to write in new recipes from friends or things you make up yourself. I can't wait to see the pictures of things she tries. If you're looking for some easy recipe ideas, you can see pictures of all the pages in my Cookbooks set. (apologies for the dim lighting but it's been nothing but GLOOMY weather for the past few days)

04 August 2008

The irresistable pull of the fabric


picnic napkin fat quarters
Originally uploaded by allisongryski


This past weekend I was visiting some friends in Ottawa. One of them is equally keen on fabric and we went on a little adventure. My husband came along to keep us company, figuring that there would be other shops to amuse him wherever we ended up. The truth turned out to be much funnier as you will see. The first place we looked for had 2 addresses according to google, but neither appeared to be correct. This was of course only discovered after much driving around along a torn up one-way street with detours. We found the 3 Tarts bakery instead and consoled ourselves with delicious cookies and brownies.

Downtown, we discovered a fancy fabric boutique where prices like $150/metre were commonplace. Beautiful things, but a bit out of our price range. They did have something for me though. I found some bias-tape makers at last! I've previously only seen these nifty little gadgets online, so I bought two: a 1/2-inch one and a 1-inch one. I may end making my own quilt binding as a result. We also popped into a sari shop around the corner and petted the pretty silks, but couldn't think of any real excuse to buy anything.

We then headed out to Orléans to find Quilty Pleasures, a quilting shop we'd learned of in the fancy-schmancy boutique. It turned out to be well worth the journey as it was filled with a lovely and extensive collection of cotton prints. But the two fabric nuts of the group didn't really find anything that suggested a project. And here's the funny part. My husband found a red-gingham-with-ants print and thought it was perfect for a picnic, so I said I'd make him a picnic napkin/basket liner with it if he found another fabric he liked for the reverse. He picked a fun and cheery golden-yellow-with-orange-flower. He bought the two fat quarters and thusly was he inducted into the impulse-fabric-purchase club. So of the three of us, the only one NOT interested in fabrics and sewing was the only one who ended up buying any fabric.

The sewing begins...


quilt blocks
Originally uploaded by allisongryski


I decided to go with the artistically random pattern and I've started sewing my quilt top. I've sketched some lines into my photo of the random layout in order to delineate the blocks and I've done 4 so far (out of 30 total). The poll was pretty evenly split, but I had secretly made my choice already (though I might have reconsidered if it had been strongly weighted in the other direction).

Since I have so many different fabrics, the theme blocks pattern still looked quite random. You could really only see the themes if you already knew to look for them. The overall effect in person was that it was a less well done job of random. It had pools of colour/pattern and yet no overall discernible pattern. I think it would have been more successful if I'd had fewer fabrics or more distinct colours.

I'm really pleased with how the squares are looking. I've been only doing a couple at a time so that I don't get careless. You can bet I'll be posting photos of my progress. I read just today that the actual quilting usually takes as long as sewing the quilt top together, so it looks like it's a good thing that I wasn't planning on having this picnic blanket for use until next year.

30 July 2008

Quilt design decisions


quilt squares on the floor
Originally uploaded by allisongryski


After the amount of time it took to do the first quilt layout, I really wasn't sure that I wanted to do it all over again. But the sewing will be a much bigger enterprise, so I metaphorically rolled up my sleeves and did a different layout. It's still an overall random appearance since I have 38 different fabrics, but the blocks of 16 have different "themes". I did an "animals and fruit" one, several "stripes and geometrics", lots of blue variations, some pink squares, etc. Thankfully, it turned out to be much faster to lay out this way. I took lots of pictures and now I can compare them.


Artistically Random


Theme Blocks


I've made a poll in case any of you dear readers have a preference.

29 July 2008

Designing the Picnic Quilt


filling in randomly
Originally uploaded by allisongryski


I started laying out my quilt!

While this is very exciting, it's also a lot more work than I realised. Much of it is turning around bent over trying to figure out where to put a square (and subsequently needing to take breaks when I get dizzy). Having something look artistically random is much harder than just making something statistically random. The human eye is so darn good at spotting patterns and groupings of similar things that it kind of spoils that random appearance.

To make matters worse, once I started laying it out, I got another idea. Barbara asked me on the weekend if I was planning to do a 9-patch type of pattern and I said no, I was going for random. But once I saw all the 38 (!) different fabrics separately as opposed to in the square tower, I thought that maybe doing blocks would look nice. To match the block size of the back, I'm thinking blocks of 16 selected by common colours in the fabrics. So I plan to lay the quilt out a second time and pick the one I like better. Who me? Make my life more difficult.... Never!

28 July 2008

Summer weekend


girl's night print
Originally uploaded by allisongryski


I hope everyone had a glorious weekend. Mine included these moments:
  • read in the park with my sweetie while we munched on graham crackers (oh how I look forward to the picnic quilt which will be much more comfortable than our dollar store tablecloth)
  • took the last bite of an ice cream cone just before the first crack of thunder
  • cut out some more squares for my picnic quilt (crossed the 500 mark)
  • had a nostalgic sleepover party with 4 of my girlfriends (we made pizza and chocolate gelato from scratch, played a cheesy 80s boardgame and watched a cheesy 80s movie)
  • lainevierge gave us matching girl's night prints that she found at the Fringe bazaar (they come from Witty Workshop)
  • made pancakes for breakfast
  • played scrabble in the park with Barbara
  • went to bed far too late on Saturday and consequently very early on Sunday


state of the stack of squares
Originally uploaded by allisongryski

25 July 2008

weed patch progress

My little weed patch has made some nice progress, but oh how I wish I'd taken a "before" picture when it was overgrown with scraggly grasses, clover, and weeds. My ground covers are spreading out nicely as you can see from this animated gif that I made (and you can see that I took one of the pics before weeding it...)

19 July 2008

TA-DA!


quilt back
Originally uploaded by allisongryski

Buttons Galore


buttons
Originally uploaded by allisongryski

There is this wonderful button shop on St-Denis. It's on the West side of the street if you go North from Mont Royal until you get there. That's how my friend Taylor and I found it when we went on Thursday. I've no idea what it's actually called but signs in the window say "boutons" and "ruban" which is precisely what they carry. Best of all, there's a big trunk FILLED with loose buttons. And you can dig through it to fill little bags. If you just scoop out a lucky-dip bag, then it's half the price (or rather, if you select buttons individually it's double the price). I got a medium bag of pick-and-choose for $4 and selected these lovelies:


You can see more pictures of my new button stash in my newly created Crafty Materials set. A rough count is about 250 buttons ... no wonder we spent more than an hour in the shop and I barely looked at anything else they had. Scooping through that trunk of buttons was as satisfying to the senses as sifting through a treasure chest of coins and jewels.

17 July 2008

Cherries at last


cherries and more
Originally uploaded by allisongryski


I alluded to an online fabric purchase here and here. Well that's it up there. The photo doesn't capture how scrumptious the cherries are... especially the larger one with tone-on-tone dots. The blue rose, green raspberry, and pink garden twirly ones were all on sale and fell into the "might as well" category. But I'm glad I did. Everything is so pretty and it all arrived at top speed. It was shipped on Friday from The Fat Quarter Shop and arrived on Wednesday. I discovered this place through my reading of yvestown, a lovely interior-decorating type of blog. This is the first time I've bought fabric online and while I will endeavour not to make a habit of it, this was a positive experience. Normally I like to see the colours properly and feel the fabric, so online isn't ideal, but the lure of browsing fabric in my pjs is pretty tempting. On that dangerous note, especially given that I've reduced the size of my quilt, I will not be buying any further fabric for it. I announce this publicly in the hope that in the glare of public scrutiny I will actually stick to my intentions.

16 July 2008

Revising grandiose plans


too big
Originally uploaded by allisongryski

In my enthusiasm to start sewing the back of my quilt, I cut out a bunch more large squares yesterday. Today I was still a few short, but decided to lay it out anyhow. I shoved all the living/dining room furniture out of the way. As you can see... it's still too immense. I couldn't even fit it in the picture. I realised that this would just be unmanageably big. I had picked the size by finding a quilting page that talked about standard quilt sizes and I went for the Queen size. Yipes... the measurements never really translated to my mind's eye. So I've decided to scale back a bit to this (5x6):


I may still cut out some more big squares to combine with my spare squares and make a second smaller quilt, but for now, they'll just get folded up and stashed. I really need to figure out a better fabric storage system since the milk crate that I tuck under my sewing desk is starting to overflow.

15 July 2008

Images from the future


a few big squares
Originally uploaded by allisongryski

Yesterday I realised that I don't actually have to have all my small squares done before I can sew together my big squares. This thought was so exciting that I immediately laid a bunch of them out on the bed to see how it might look. Big was the answer I got. I only got a 4x4 section laid out and the final size planned is 6x7. (Apologies for the rather poorly lit photo, but you can't count on good lighting when you indulge yourself in instant gratification.) I shall plow ahead and not look back. A huge picnic quilt is a cozy delight and much more flexible than a small one. Since I still need to cut out 9 squares for the back, I decided to give myself the immediate satisfaction of drawing a layout of the different patterns.


This may not bear the least bit of resemblance to the final layout, but it was a lot of fun drawing not-to-scale, not-very-accurate little versions of my patterns. I felt like I got a glimpse of what this quilt will be.