30 April 2008

Crafting something yummy


sweet potato ravioli
Originally uploaded by allisongryski

I was feeling a bit crafty today and something edible was the result. I quite enjoy making pasta by hand and since I've done it rather a lot, I can now knock it out in about 15 minutes. Cutting it into noodles is the speedy option, but occasionally, the fiddly and pretty is what appeals. We had made some ravioli last night, so I still had lots of filling on hand. I just made up the ravioli filling and you could improvise something with whatever vegetable you have on hand. This sweet potato filling was made from boiled, then mashed sweet potato, flavoured with a bit of thyme (dried, from last year's garden), feta, and salt and pepper.

I've now worked out my favourite method for making the ravioli itself. Make up a double-batch of pasta dough (1.5 c flour, 0.5 c semolina flour, 2 eggs) and roll the dough into a long banner of pasta (I recommend using a proper pasta roller rather than trying this with just a rolling pin). Flour your work surface and spread out a section of the dough. Cut it in half lengthwise and then into sections the same width as your fluted cookie cutter. Place blobs of filling (not too much!) on the upper half of each rectangle of pasta (see photo above). With a pastry brush or finger, draw a line of water around the outside edge. Fold the lower half up over the filling and line up the edges. Cup your hand around the filling and work all the air out as you seal it up. Cut with the cookie cutter, leaving part of the fold intact for a pretty scallop shape. The cookie cutter is not only to make it pretty, but also to help firmly seal the ravioli.

If you want to make extra to save for later, freeze the ravioli in a single layer on a floured cookie sheet before storing in a bag or box in the freezer (this prevents it from sticking together). You can also do this with all the extra bits of pasta that get cut off.

Homemade ravioli takes about 4 minutes to cook in salted, boiling water.

26 April 2008

In which I discuss squares


quilt squares for picnic blanket
Originally uploaded by allisongryski

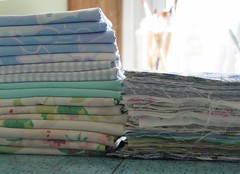
So where have I been and what have I been doing? Well, last Saturday's picnic inspired me. We used a plastic dollar-store tablecloth for our picnic blanket and I thought how much nicer it would be to have a lovely patchwork picnic quilt. I thought about some of the vintage sheets in my fabric stash (some fun green-striped ones from my Mom) and how I've often seen pretty sheet patterns at the thrift store. An idea was born. I do have a bit of a tendency to go off the deep end with new projects and this one's no different. My plan requires 42 16.5"x16.5" squares and 672 4.5"x4.5" squares. So the past couple days, I've been cutting squares like a madwoman. I have half the large and a third of the small squares cut out so far.

On Monday, I found an awesome blue-purple 60s-style flowered sheet at the Sally Ann. On Wednesday, one of my crafty girlfriends gave me some leftover vintage sheet and pillow case bits from an apron-making day that I had missed. On Thursday, I found three suitable pillow cases between a local church bazaar and a local thrift shop (and two skirts that were $3 each!). I plan to use some of the sprigged cotton in my stash for a bit more. My aim is to mainly have it be pale shades of blue, purple, pink, and green. I don't want to overwhelm it with the striped sheets of which I have a TON. However, 672 squares is a lot. I think a polka-dot is necessary and a cherry-print would be a picnic classic. There is also probably much fun thrift-store rummaging in my future. I'm aiming to mostly use fabric that I already have or recycle stuff I find on the cheap. It's both thrifty and environmentally conscious! I also like the idea that every square will have a story. It won't just be "oh I bought all this fabric new". Despite how far away the actual finished quilt is, I am having tons of fun imagining all the sunny picnics in its future: spread out when we're joined by lots of friends, folded a bit for pillowy comfort when it's just my sweetie and me, the edges pulled around when it's a bit chilly.... oh the picnics we will see!

22 April 2008

Happy Earth Day


hankies on the laundry line
Originally uploaded by allisongryski


Things I do, that you can too:

  • use hankies rather than paper tissues
  • use cloth napkins
  • don't own a car, walk and use public transportation
  • don't own a dryer, hang all our laundry to dry
  • plant a balcony garden with some veggies
  • shop at the farmer's market
  • buy free-range eggs
  • make most of our bread and pasta by hand
  • don't drink bottled water
  • use vegetable trimmings and bones to make soup stock
  • preserve seasonal fruits/veggies
  • use cloth grocery totes
  • buy second-hand (clothes and furniture are obvious things to consider second-hand)
  • learn how to sew and repair or re-purpose things
  • in summer, only use the AC when it's absolutely sweltering and sleep wouldn't otherwise be possible
  • in winter, keep all heat off except kitchen, bathroom, office (and turn down at night)


Those last two mainly revolve around accepting that it's silly to expect to always be at some optimally comfortable temperature. In the winter, I wear more cozy things and expect that I will be a bit chilly and need to drink more tea and hot chocolate. In the summer, I wear light, breathable fabrics, and expect that I will be hotter and need to drink more water.

What do you do?

Pick a colour


angel card
Originally uploaded by allisongryski


I was busy with some custom orders and other things, so I never mentioned that I created a new poll. You can interpret the question however you please. If you think you're being especially creative in your interpretation, do leave me a comment!

20 April 2008

What? Huh? Spring?


Strawberries
Originally uploaded by allisongryski


In typical Montreal style, we've skipped spring in favour of glorious summer. The trees, still lacking any foliage, would disagree with me. They are just decorated with little bobbles at the moment. But I went on my first picnic of the year, yesterday afternoon. The first of many I hope.

We prepped some strawberries and lemon drizzled apple slices at home. Then, lugging a picnic blanket, books, frisbee, and juice, we walked over to Le Fromentier, a delicious boulangerie/fromagerie where we bought some ficelle au fromage, baguette, and for cheese, some morbier and a local ooey-gooey chèvre (for which I foolishly did not get the name). We then headed to the park and set up a spot. The books and frisbee remained untouched in favour of basking in the sun and munching on yummy things (yeah, I know, not a beautifully styled photo that last one, but I was too busy enjoying the picnic to bother). We spent two hours snacking, and chatting, and basking, and people-watching. Oh how I love Montreal.

18 April 2008

Cupcake cards in shop!


Yellow birthday cupcakes card
Originally uploaded by allisongryski


The cupcake cards are now available. I've listed one pink and one yellow to begin with. I have a few other styles that I'll be adding in the next few days.

16 April 2008

Practically edible cupcake cards


Pink birthday cupcakes
Originally uploaded by allisongryski


Since "birthdays" is currently winning the "when do you send cards" poll, I decided to sort through my photos for things that I could make into birthday cards. While many of my flower and butterfly photos are excellent for birthdays, cupcakes seem especially appropriate. I already make some stamped cupcake cards (a couple of which I've given for birthdays myself). While the stamped cards are adorably cute, I think these photo cards are going to be mouth-watering. It's too late to run to the photo shop today though, so these cards probably won't come into existence until Friday. For now, you can take a look at my Papery set for the photos that I'll be using.

When do you send cards?


Orange butterfly on bamboo
Originally uploaded by allisongryski

It's time for a new poll... and this one is all about when you usually send cards. The most common events that I send cards for are birthdays, Christmas/winter solstice, and thank you notes. I think the latter has rather gone out of fashion. It's particularly important for me since my family lives far away so my presents usually come by mail. A thank you note both acknowledges receipt and lets the givers know that I appreciated their thoughtfulness. I always have a stash of blank non-occasion-specific cards for sending thank you notes. I don't like the cards to be too big, since if I want to write a letter, I will do so on paper. This is one reason that I chose to make 4.25x5.5" cards. They're just right for a short little note to accompany your thanks, birthday greetings, or whatever.

Please take the poll in the sidebar and leave me a comment with any other occasions that you give cards (e.g. anniversary, valentine's day, other winter holiday, get well soon, just to say "thinking of you", etc).

14 April 2008

String girls and the creative process


Fly with me
Originally uploaded by allisongryski

On Saturday, I was playing with some bits of jute twine snippings and out of that came these string girls. The first one was actually Sun girl because I started by making the sun and then I was experimenting with knotting the leftover bits of twine. It was quite an organic process as I just followed what the medium told me and suddenly, a form appeared. My creative method sometimes starts with a fully formed idea in my mind, which I then attempt execute. This can be a frustrating method when I can't achieve what I saw in my mind's eye, but it can also be very satisfying to conceive a vision, then make it reality. But there's a certain joy to the magic of just playing with things and letting one thing lead to the next. You end up with this sense of natural creation.... that it was meant to be that way.

Did you notice the pink tulips on the Sun Girl card? Those were a bit of the Petits Gateaux box.

These cards are difficult to photograph because of their three-dimensional nature. I've left the arms, legs, and pigtails free, so they have a lovely sense of movement in person... like they're reaching off the card.

12 April 2008

Photo cards are on their way...


Architectural card preview
Originally uploaded by allisongryski

The photo shop finally got the printing of my photos correct (oh, the saga!) and I was able to make some cards at last. I *love* how they turned out. I've got to take some better pictures of the cards when I have a sunny day. For now, these artificial-lighting-then-GIMP'd ones will have to whet your appetite. You can see some of the other cards in my Papery set.

09 April 2008

Watering Can linocut design


Watering Can linocut
Originally uploaded by allisongryski


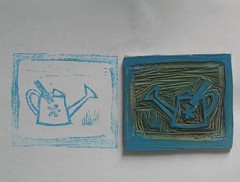
Sometimes the boot of an awaiting audience (however small) is enough to get you going quickly. So here's the watering can linocut that I'm working on. I think it still needs a bit more cleaning up, and I'm not sure if I want to keep the border or not.

I've definitely got to work out a better way to print it. My cardstock is quite thick and textured, so it would probably look even more patchy on that surface with my current technique. I have a proper roller and ink that I have yet to try out since that's not really good for a quick test-print and I am expecting that to give a cleaner print. I've been reliably informed that the bottom of a baby food jar is good for simulating a press and the tutorial that I linked to before suggested the back of a spoon.

08 April 2008

Which 6 orchids do you prefer?


Orchid set
Originally uploaded by allisongryski


I'm working on selecting photos for my first photograph cards. You can see my prototype photo card, which I made yesterday. The actual ones will use the deckled (ragged edge) cardstock that I used for some of my stamped cards.

What I want to know from you, dear reader, is which of the above orchid pictures would you like to see on a card and what type of set would you like. Please take the poll in the sidebar and select 1 type of set and up to 6 of your favourite orchid pictures.

The last poll showed a "watering can" as the clear favourite for a new stamped design. I wonder if that's because we're all ready for spring and summer gardening. I know that's why the idea occurred to me. I'll be sure to post the design when it's ready.

07 April 2008

Petits Gâteaux: a review


Petits Gâteaux
Originally uploaded by allisongryski


I love food: making it, eating it, and reviewing it. Ever since D and I moved to Montréal in 2004, we have kept a Montréal restaurant review guide with short reviews of everywhere that we've tried. When it comes to food, we are very picky. This food snobbery doesn't mean we're only interested in caviar and quail eggs, but we do expect food to be delicious and good value for the money. With writing reviews, we can hugely enjoy eating at a restaurant with terrible service, if only to note all their gaffes and report on them later. Equally, when a restaurant impresses at every level, we sing its praises to all and sundry.

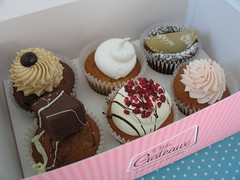
Last week, I received an email from Claire, one of the co-owners of Petits Gâteaux. She had read my (rather negative) review of Petits Gâteaux on my restaurant guide and invited me to come visit again since they had a new pastry chef. We came to an arrangement that she would provide some cupcakes for D and me to taste test in exchange for a review here and an updated entry in the guide. I fully disclose that the cupcakes shown above were provided to me free of charge. When tasting them, however, we kept in mind that the standard price is $2.85 for an individual cupcake or $15.00 for a box of six.

Here is my review from June 2007:
The shop is very cute... cuter than the cupcakes, which were slightly sloppy in appearance and a bit dense and dry. The lemon icing was nice, but the pink stuff on the vanilla ones was over-sweet. Cocoa Locale is much better.
My updated review in the guide reads:
Very cute shop, which matches the cupcakes. The raspberry-sour cream cupcake is stunning and the chocolat-poire and tarte citron cupcakes are delicious. There's an appealingly wide variety of flavours and styles. This place has vastly improved with the new pastry chef.
My first impression was that I can understand why Claire was keen to have me visit again. As you can see from the picture, the cupcakes are certainly appealing looking. The shop was bustling with a long line-up when I entered. Despite everyone's natural indecision on which cupcakes to select, with 2 shop girls serving cupcakes, plus Claire, and another lady at the cash register, the line moved along speedily. I allowed Claire to choose a selection of the cupcakes and since I wasn't in a rush, I waited for one flavour that was still in the kitchen. This allowed me some time to take a few pictures of the shop and to see that there was very speedy turnover of cupcakes. Even late on a Saturday afternoon, fresh cupcakes were coming out regularly. After wishing me a good tasting and asking for feedback of anything that we did not like, Claire sent me on my way with a beautiful box of 6 flavours (tarte citron, raspberry sour cream, coffee, choco-poire, vanilla, and banana-fudge). Merci Claire!

D and I cut each cupcake in half so that we both tasted each flavour. Overall, there was a nice variety of flavours and textures. Some were more like muffins, while others were definitely dessert confections. I particularly appreciated that there were some choices without icing, something that's often hard to find in a cupcake shop.
Tarte Citron: A not-too-sweet lemon meringue pie inspired cupcake. It had a really yummy custardy lemon filling, though this filling did make parts of the crumb a bit gummy. Despite that, it was one of my favourites out of the six.

Raspberry-Sour Cream: This was by far the most beautiful cupcake. All the raspberries were at the bottom of the cupcake, though. I'm not sure if this was intentional, or if they sank in the batter. I would have
loved this cupcake if it had a bit more of the raspberry/sour cream tartness that I was hoping for. As it was, I just liked it a lot.

Coffee: It had a nice coffee scent, but not overwhelming coffee flavour (though this might depend at what stage you eat the chocolate-covered coffee bean on top). It reminded D of coffee cake as in cake to eat with coffee. I think this was due to the slightly more muffin-y texture.
After sharing three cupcakes, we needed a bit of break, so we put the rest in the fridge. The next day, I took them out for about an hour, before eating them. I figured that this was the sort of thing we'd do if we were purchasing cupcakes and likely, something other customers would do too.
Vanilla: This was probably my least favourite and I'm not sure that I would buy it. For such a simple cake, it needs to be outstanding, and it was just OK.

Banana-fudge: This had a very good banana flavour with a delicious rich chocolate fudge on top. It was by far the most muffin-like in texture, which might or might not appeal to you.

Choco-poire: A very rich chocolate cake with a juicy pear slice. I would highly recommend this one to anyone who doesn't like icing and it's certainly one I'd pick again (even though I do like icing). Rich and desserty, but not too sweet.
Petits Gâteaux has definitely benefited from the change in pastry chef. I will certainly consider buying cupcakes from them again and in fact, I think it slightly dangerous how conveniently located they are. They have a wide variety of flavours, and also offer mini-cupcakes, not to mention a cupcake-and-beverage (milk, tea, or coffee) deal for $3.95. I think they offer something a little different from my other cupcake favourite, Cocoa Locale. If you visited before August 2007 and were disappointed, I'd say they were worth another go.

For more pictures of the shop and the cupcakes, see my Petits Gâteaux flickr set.

Petits Gâteaux
783, av. Mont-Royal Est
Montréal, Québec
514-510-5488

04 April 2008

A rainbow of envelopes


A rainbow of envelopes
Originally uploaded by allisongryski

Enough with the boring shipping rates (though I'm hopeful that those tables will be both useful to me in the future and save someone else the trouble of digging through all the different pages and docs).... but on to the pretty paper stuff!

I'm planning a new order of cardstock, which means that it's time to choose some envelope colours. Seriously, picking out colours is by far the most fun part of ordering supplies. As a child, I used to love looking at all the pencil crayon colours in art stores. You know the kind where each one is sold separately and there are a bazillion shades of each colour. Fun.

Anyway, last time, in addition to some red, blue, bright pink, and lime green envelopes, I ordered the sample pack so that I could see all the colours in actuality. It's proved very useful as some colours are much prettier in real life (and some, well, beige is beige). It also means that I can hold them right up to the ink or photograph for the best match. I've narrowed it down by half, to 11 colours. Anyone who knows me wouldn't be surprised to hear that the 3 shades of orange were the easiest for me to edit out. (I like orange fine.... in sunsets and flowers and pumpkins. But not so much on anything man-made). Though, as I write this, I realise that the dark orange would probably look great if I make photo cards with some of my squash or poppy photos. hmmm.

You see my problem: as soon as I eliminate a colour, I think of where it would be perfect and my stack grows larger again.

CanadaPost small packet rates

As promised, I've made up a table for the small/light packet rates. Canada is not included because there is no parcel flat-rate. You can refer to the enormous table in the price guide PDF and cross-reference with the rate code and rate zone PDF (both PDFs found on this page). Or you can use the find-a-rate calculator tool on the CanadaPost website. Note that you'll need the destination postal code to accurately use the calculator.


USA 0 - 100g 100g - 250g 250g - 500g 500g - 1 kg 1 kg - 2 kg
Small Packet (surface)

max: L: 600mm, L + W + H: 900mm

$5.05 $7.20 $10.70 n/a
Small Packet (air)

max: L: 600mm, L + W + H: 900mm

$6.45 $8.55 $13.25 n/a
Light Packet

max: 380mm x 270mm x 20mm

$1.92 $4.00 $6.40 n/a
International 0 - 250g 250g - 500g 500g - 1 kg 1 kg - 2 kg
Small Packet (surface)

max: L: 600mm, L + W + H: 900mm

$5.65 - $6.00 $7.65 - $8.10 $12.85 - $13.65 $18.85 - $20.00
Small Packet (air)

max: L: 600mm, L + W + H: 900mm

$7.75 - $8.20 $14.90 - $15.80 $29.20 - $31.00 $45.60 - $48.40
Light Packet

max: 380mm x 270mm x 20mm

$3.75 $7.52 $12.80 n/a


The small packet rates include $100 coverage for loss/damage.

I've just listed the min-max range for the international rates because the final price depends on the specific country to which you're mailing. To determine exact cost, you'll need to find the rate code for the destination country and check that the desired service is available. Here is a link to the country listing information. You'll then need to cross reference that with the more detailed information in the Canada Post Prices PDF that I provided links to above and in my lettermail post.

03 April 2008

CanadaPost lettermail shipping specs

My first step to understanding shipping is to get all the definitions together. Canada Post has separated the rules for dimensions from the weight/price list on their website. They have also separated the destinations onto different pages. So here's the grand-total lettermail scheme all in one table.

Sending an item as lettermail is the cheapest option, though it doesn't include any insurance or tracking by default. To get delivery confirmation, you need to send your item as "Registered Mail", which costs $7.25 for within Canada, or $12.50 for international destinations. That's on top of the lettermail postage price. Sending it as a small parcel might be cheaper because then tracking is included in the price.

Lettermail


CANADA USA INTL
Standard


(max: 245mm x 156mm x 5mm)*


(min: 140mm x 90mm x 0.18mm)

Weight Price
Up to 30g $0.52$0.96$1.60
30g - 50g $0.96$1.15$2.30
Non-Standard/Oversize


(max: 380mm x 270mm x 20mm)


(min: 140mm x 90mm x 0.18mm)

Up to 100g $1.15$1.92$3.75
100g - 200g $1.92$3.20$6.40
200g - 500g $2.65$6.40$12.80

*Note that for USA/INTL, the max width is listed as 150mm.
For all the fine print, see the Canada Post Guide to Lettermail.

They have one page, which is not easy to find, that has a very nice PDF with all the relevant information in one place: Canada Post Prices. Or, you can see a list of all the PDFs. I recommend the main "Canada Post Prices" one.

My next step is scanning through these docs to make a handy reference table for the small/light packet rates.

petit assemblage


petit assemblage
Originally uploaded by allisongryski

I've been playing around with some collage and mixed media works recently. I had to put them aside until I had the rest of the supplies that I wanted. I have now acquired some little 4x4 canvases and some finishing spray and I'm looking forward to finalizing the layouts.

The inspiration was a tatty old French translation of Jane Eyre that I found for $1.00 in a local bookshop. I just started out randomly playing with bits of words and paper... and then I happened across the word petit and the word assemblage. Fate.

(for the non-French speakers, "petit assemblage" translates roughly to "little collection").