Showing posts with label paper. Show all posts

01 December 2010

Lacy Paper Snowflake Tutorial

More Snowflakes


Scroll to the end of the post for the giveaway winner!

For everyone who wants to make some lacy snowflakes themselves ... Start with my tutorial on how to make snowflakes with six points. The following tutorial explains my method for making the "lacy" or "stained glass window" style of snowflakes (and it assumes you already know the basics of snowflake making).

Materials:
  • A pair of sharp scissors with good points (I have some little red Singer sewing ones that I bought at a grocery store several years ago). If someone in your house likes to sew, do NOT steal their good sewing scissors as cutting paper will dull the blades.
  • Paper, one of three kinds: wrapping paper, old magazines, or printer paper. Avoid anything thicker than printer paper as it will be too bulky to cut nicely once it's folded.
    • Plain silver or gold wrapping paper is really pretty and since it's thinner than printer paper, it's easier to cut.
    • Magazines tend to be very thin and will rip easily if you're not careful. It's also slippery since it's glossy on both sides. However, it's essentially free, easy to cut when folded, and you can get a huge variety of colours from a single magazine.
    • White printer paper is cheap and plentiful in most households and it creates the classic white snowflake.
  • Optionally, you can use a protractor and/or pencil to help with folding precisely or even planning your pattern before cutting, but mostly I don't use either.

Size:
As for size, it's entirely up to you. I aim for slightly smaller ones -- usually I fit about 4 snowflakes to a sheet of A4 or letter-sized paper. If you make some larger ones, remember you can make tiny ones from the scraps.

The Snowflake Secrets
On to the tips! I've drawn on the paper in some cases to demonstrate the point, but I don't do this when actually making snowflakes. I tend to make it up as I go along.

1. Leave Less Paper
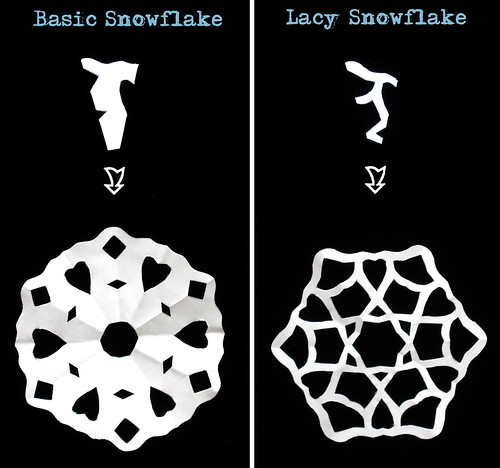
Most people make snowflakes that look something like the snowflake on the left (pretty, but a bit plain). But, it doesn't require an exacto knife or great skill to make a snowflake like the one on the right. The truth is that it's no harder, you just need to cut away MORE paper before unfolding! (I just folded the snowflake on the left back up and did exactly that to get the snowflake on the right).

Snowflake Types


Focus on the paper left behind more than the shapes you're cutting out, since once you unfold it, the paper will be the "positive" space and the shapes the "negative" space. To use the stained glass window metaphor, the paper will form the "leading" of the window.

If in doubt, keep cutting away until you only have thin lines of paper. Your snowflake may look quite boring when folded, but that all changes when you unfold it! (For the mathematical amongst you, the bit that you see when it's folded is 1/12th the final snowflake).

2. Use Simple Shapes
Start with cutting out only simple shapes. The easiest are triangles or wedges that require only two straight snips into the paper. You can still get a beautiful result just by cutting away most of the paper.

Cutting simple shapes


3. Use Large Shapes
Don't be afraid to cut out large shapes. It may be easier to cut a large piece out in several steps, especially if it's a complex shape.

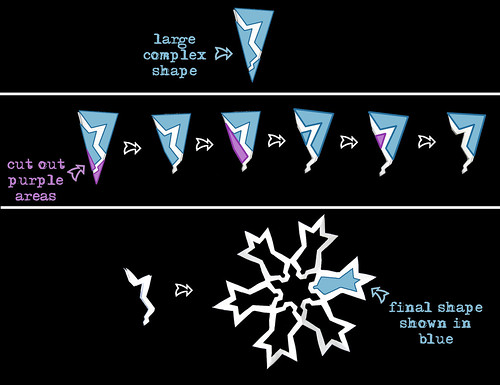
Cutting out a large shape


4. Cut Methodically
Work your way from one end to the other (ie. top to point or vice versa), rather than randomly cutting stuff out. This makes it easier to ensure you don't have big bits of paper left in the middle.

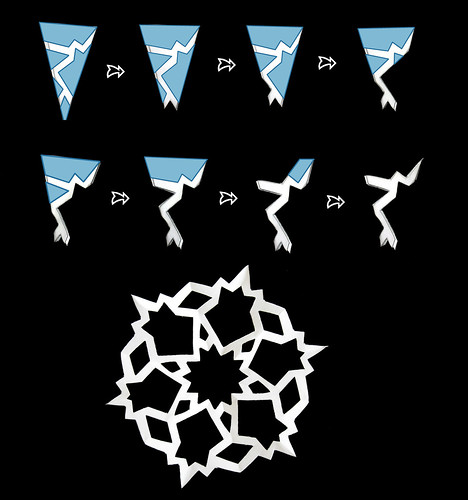
Snowflake step-by-step


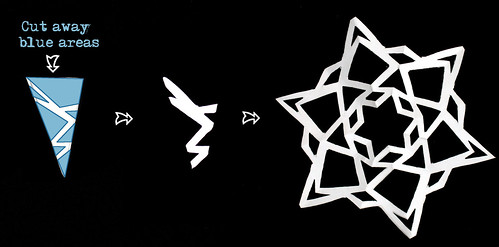
5. Pointy Snowflakes add Variation
To make a snowflake with decided points, remember that you will need to cut off most of one side of your wedge to achieve that effect.
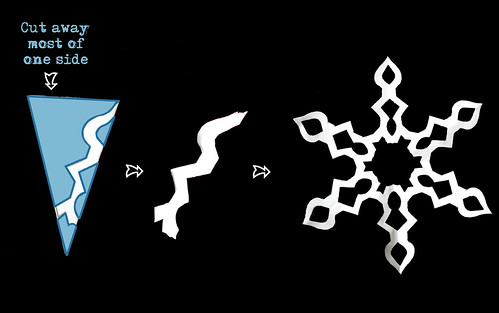
Pointy Snowflake


6. Make Lots of Snowflakes
Practice is obviously always helpful. My first few are usually less successful than the ones I make later.
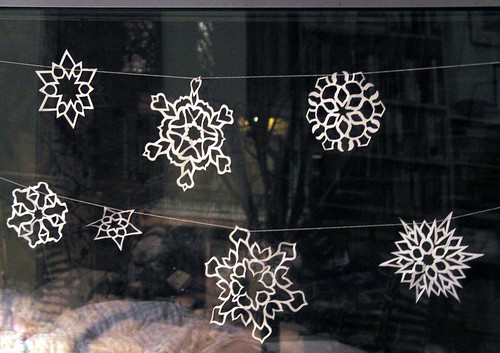
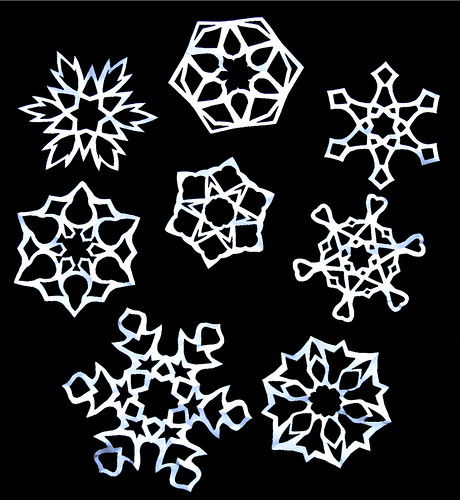
7. Display Together
My final tip is to always display your snowflakes in groupings. They invariably look more impressive together than individually.


Even More Snowflakes


I hope these tips help you make snowflakes you love. I've got a stack made to go on our tree. This year it will just be our potted ficus tree, rather than a proper "Christmas" tree. I will be waiting until the Winter Solstice to decorate it, as is tradition in my family. So exciting to think that there will be a little one next year, with whom to share these traditions and begin new ones.

If you make some snowflakes using this tutorial, I'd love to see them! Please add your pictures to my flickr group.

And the winner in my snowflake giveaway, chosen by the Random Number Gods is ... Angela #2! I also decided to pick a second winner ... the very first commenter on the post! Congratulations to both of you, I'll email you for your mailing addresses today!

Photographs and artwork by Allison Gryski. © All rights reserved.

23 November 2010

Snowflake Giveaway!


Snowflakes


I always have so much fun making paper snowflakes that I know by the time I'm done, I'll have rather more than I really need. So, I thought it might be fun to send some out into the world.

For one lucky person, I'll send a Christmas card from the Netherlands to anywhere the postal system will take it, with a few of my snowflakes tucked inside. The snowflakes I'll send will be similar to the ones shown in the pictures here. Some of them are made from magazines, which means that the back may not be as decorative as the front. For a chance to win, comment on this post by Tuesday, November 30, and I'll pick a random winner on December 1.


Photographs and artwork by Allison Gryski. © All rights reserved.

19 November 2010

Tutorial: Paper Snowflakes (with 6 sides)


Snowflakes in the window


One of my Christmas traditions is making paper snowflakes. I love the surprise each time you unfold a new one. I think they make lovely decorations for windows and trees and presents.

I started making them when I was really little and I was always inspired by the beautifully lacy ones that my artsy older sister made. I learned that the secret is to not focus so much on the shape you're cutting out, but the amount of paper that you're leaving behind.

The most common way to make them results in 8-sided snowflakes. If you want a slightly more accurate snowflake with six points, here's how to fold your paper.

1. Fold a square of paper diagonally in half. (Trim off any excess if your paper is not square).


Snowflake Tutorial - Step 1


2. Fold in half again.


Snowflake Tutorial - Step 2


3. Now for the slightly tricky part, you need to fold it in thirds. First fold one side across to the two-thirds point. (If you want to be really precise, you can measure it with a protractor -- the two-thirds mark will be at 60°.)


Snowflake Tutorial - Step 3


4. Then fold the other side all the way across, matching the edges. If you fold it underneath as I did here, the paper forms a zig-zag.


Snowflake Tutorial - Step 4


5. Trim off the uneven top edge.


Snowflake Tutorial - Step 5


6. Cut out a bunch of shapes, then unfold and admire (you can always fold it back up if you want to cut out more).


Snowflake Tutorial - Step 6


To flatten your snowflake, gently press it open, then carefully iron it on a low setting with a tea towel in between the iron and the paper.

If you like colourful ones, make them from old magazines or leftover scraps of wrapping paper. You can also colour or paint your paper or decorate the snowflakes with glitter after they've been cut out. Though, to be honest, when I tried the glitter idea, I managed to get more glitter on me than the snowflake. I think making them out of sparkly wrapping paper is a better method.

I'm off to make a proper snowfall of tiny paper cuttings and create some pretty snowflakes to hang in my ficus tree!

If you make some snowflakes using this tutorial, I'd love to see them! Please add your pictures to my flickr group.

Update: See my follow-up tutorial to learn how to make Lacy Paper Snowflakes.


Photographs and artwork by Allison Gryski. © All rights reserved.

13 June 2008

Read between the lines ...


Read between the lines
Originally uploaded by allisongryski


I've listed a couple new collage/mixed media cards in my etsy shop: a string girls one and a woven paper collage one.

The latter was a bit of an experiment as a result of a mishap. I mucked up the alignment of my signature stamp on the back of a card, so it was essentially scrap. I started thinking about how I could use part of it to make a fun flap-door on a card. From there, I was thinking of hidden meanings, and the phrase "read between the lines" popped into my head. You can see the front of the card in my Papery set at flickr or click through on the etsy listing.

27 May 2008

Paper-making and a meme


Handmade Paper
Originally uploaded by allisongryski


On Saturday, I experimented with paper-making along with several of my crafty girlfriends: fuzzymitten, lainevierge, superfink, and callmepavlov. We get together for crafty parties every month or two and have knitted, sewed, baked, and carved rubber stamps in the past. It's fun to try out new things, teach each other new skills, and inspire one another to be more creative. We used the technique described in this tutorial. It was messy, but lots of fun.

We collected all sorts of scraps for our paper: leaves, petals, fabric, tissue paper, wrapping paper, old comics. Just make sure that you don't use glossy paper because it won't break down as well. Coloured tissue paper has a lot of dye, so it's a good choice if you want to add colour since colour dilutes a lot when making paper with this method. The paper shown above had dark purple tissue paper scraps added to a greyish paper slurry. It looked quite dark when wet, but dried to a pale blue-purple.

I was also tagged by fuzzymitten for this meme.
1. What was I doing 10 years ago?
I was just starting my B.Math in Computer Science.

2. What are five (non-work) things on my to-do list for today?
ironing, pattern-making, reading, watching a movie, yoga

3. Snacks I enjoy:
toast, chocolate, fruit (especially berries in the summer!), ovaltine

4. Things I would do if I were a billionaire:
It's hard to really imagine, but I expect I would travel more and I'd like to think that I'd give a lot of that money away.

5. Places I have lived:
BC: Vernon, Vancouver
AB: Calgary
SK: Saskatoon
ON: Waterloo, Ottawa
QC: Montreal

So I have some means of comparison when I say that I love Montreal.

6. Jobs I have had:
lab assistant, software tester, software developer, web developer, tech writer/editor, artist
Consider yourself tagged if you'd like to be!

04 April 2008

A rainbow of envelopes


A rainbow of envelopes
Originally uploaded by allisongryski

Enough with the boring shipping rates (though I'm hopeful that those tables will be both useful to me in the future and save someone else the trouble of digging through all the different pages and docs).... but on to the pretty paper stuff!

I'm planning a new order of cardstock, which means that it's time to choose some envelope colours. Seriously, picking out colours is by far the most fun part of ordering supplies. As a child, I used to love looking at all the pencil crayon colours in art stores. You know the kind where each one is sold separately and there are a bazillion shades of each colour. Fun.

Anyway, last time, in addition to some red, blue, bright pink, and lime green envelopes, I ordered the sample pack so that I could see all the colours in actuality. It's proved very useful as some colours are much prettier in real life (and some, well, beige is beige). It also means that I can hold them right up to the ink or photograph for the best match. I've narrowed it down by half, to 11 colours. Anyone who knows me wouldn't be surprised to hear that the 3 shades of orange were the easiest for me to edit out. (I like orange fine.... in sunsets and flowers and pumpkins. But not so much on anything man-made). Though, as I write this, I realise that the dark orange would probably look great if I make photo cards with some of my squash or poppy photos. hmmm.

You see my problem: as soon as I eliminate a colour, I think of where it would be perfect and my stack grows larger again.