
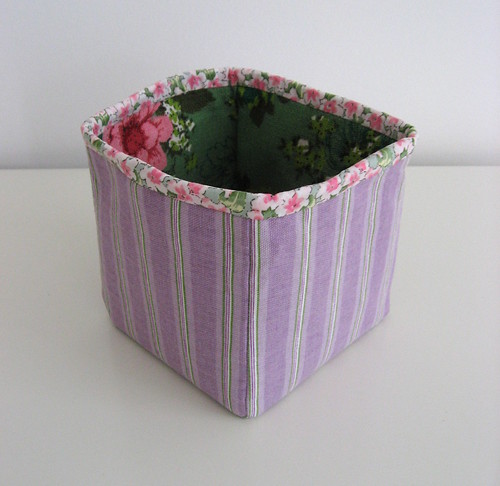
Fabric Box
I wanted to make one using just interfacing (since it's what I had on hand) and I liked the look of this fabric box. I aimed for something similar, using the basic cube construction that I learned from this soft baby cubes tutorial (which I have been using to make some fabric blocks for Bun). I decided to take pictures of the process and write up what worked for me. This will make a 5x5" box.
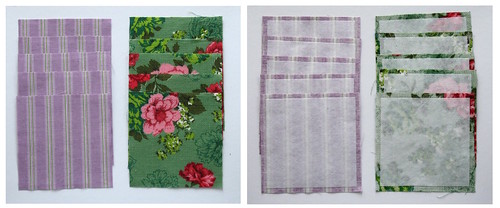
Materials:
- 5 squares outer fabric (5.5 x 5.5 inches each)
- 5 squares lining fabric (5.5 x 5.5 inches each)
- 10 squares interfacing (5 x 5 inches each)
- Fabric for binding the edge (3 x 25 inches)

Fabric Box Materials
I mostly used heavier weight fabrics and interfacing for this project. My binding fabric was just regular quilting cotton, though. You may only want one layer of interfacing if the kind you're working with is very thick. You can adjust the size of your box as you like, just make sure the interfacing does not include seam allowance.
Step 1: Iron interfacing to fabric squares
Fabric Box - Step 1
Iron the interfacing squares to the wrong side of all of your fabric squares. Make sure that you've got them centered, with a 1/4" seam allowance all the way around. If you're only using one layer of interfacing, I'd use it on the outer fabric, rather than the lining.
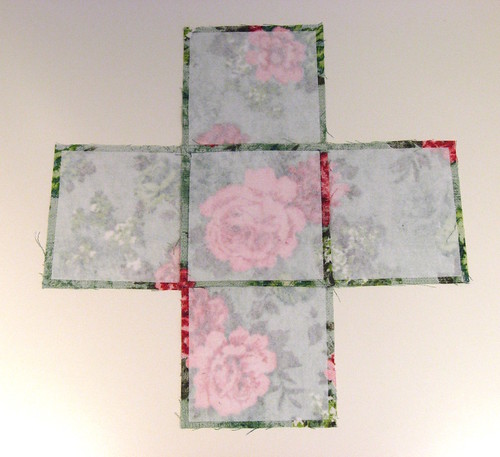
Step 2: Start sewing lining
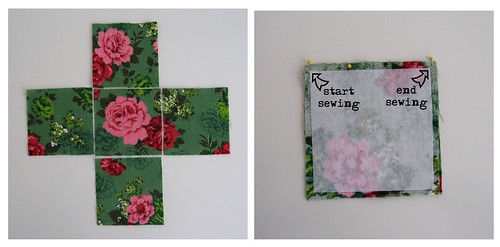
Fabric Box - Step 2a
Lay out your lining pieces in a plus symbol. The center piece will be the inside bottom of your box. If the fabric has a directional pattern, sort out how you want the squares oriented. Next, pin the lower piece to the center piece, right sides together. Now sew that one seam, following the edge of the interfacing. Be sure to start 1/4" in and leave the last 1/4" un-sewn, so your stitches should just be alongside the interfacing. Backstitch at the start and end to secure. Repeat for the upper square, attaching it to the middle square, so you have a strip of three. Press the seams flat (not open!), facing out from the middle square.

Fabric Box - Step 2b
Step 3: Connect the side squares to create plus shape
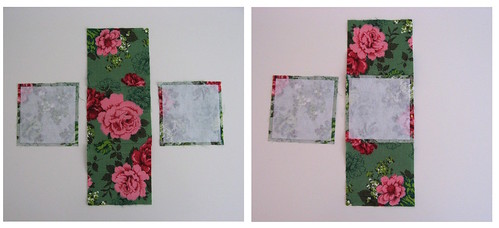
Fabric Box - Step 3a
In the same manner as above, sew the remaining two squares to the middle square, to create the plus shape you laid out. As before, do not sew through the seam allowance. When you're done, the middle square of interfacing should be outlined with your stitching. Press the new seams flat, facing out from the middle square.
Fabric Box - Step 3b
Step 4: Sew up the sides of the lining
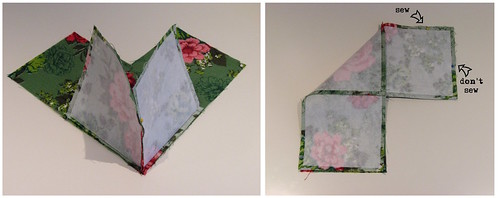
Fabric Box - Step 4
Pick any two of the side squares and lift them up, to begin creating the box shape. Pin them together and sew the seams as before, just following alongside the interfacing, and leaving the 1/4" at the start and end free. I find it easier to sew if I also pin the top edges, so it lays flat. I make sure to use a different pin colour so that I don't accidentally sew that side together! Repeat this for all four sides of the box.
Step 5: Sew outer box and trim seams
Fabric Box - Step 5
Sew the outer squares together in the exact same manner. I trimmed the seams of the lining with pinking shears and trimmed the bottom corners of both the lining and the outer box to make them fit together more easily.
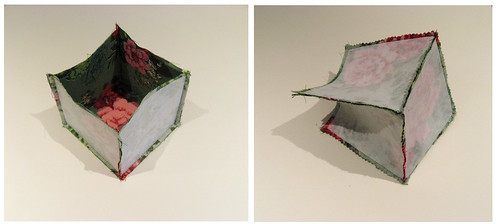
Step 6: Insert lining into outer fabric box
Fabric Box - Step 6a
Flip your outer fabric box so that the right side is facing out. Once it was flipped, I ironed a bit along the seams to try to crisp up the square shape. Stuff your lining (with right side still facing in) into the box and fuss with it until the corners are lined up. It will probably still look rippled, like mine did, so pin it all together, then sew a seam along the top edge to hold it snug (this will get covered by the binding in the next step).
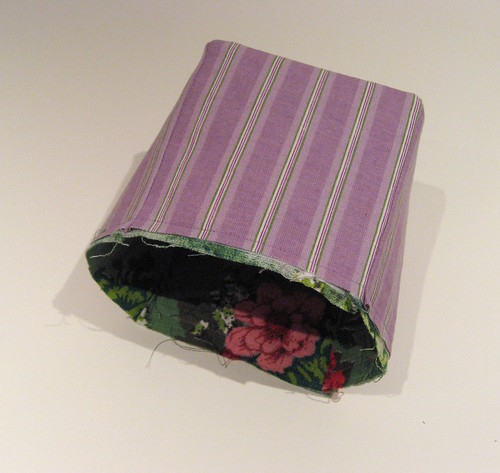
Fabric Box - Step 6b
Step 7: Attach binding
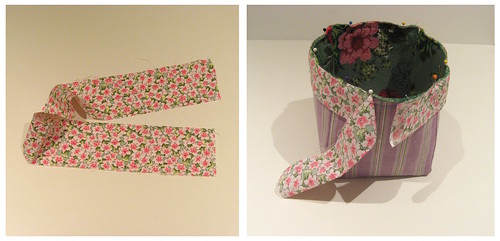
Fabric Box - Step 7
Iron your strip of binding fabric in half lengthwise, then pin it to the upper edge of your box (with the fold along the bottom). I normally follow the quilt binding technique as explained by Heather Bailey. I found I didn't have enough space along the side to do the joining part. Instead, I ironed back one raw edge into the inside of the binding strip, and just tucked the other end of the binding inside that. I then sewed around the whole top edge of the box, using a 1/2" seam.
Step 8: Hand-stitch binding on the inside
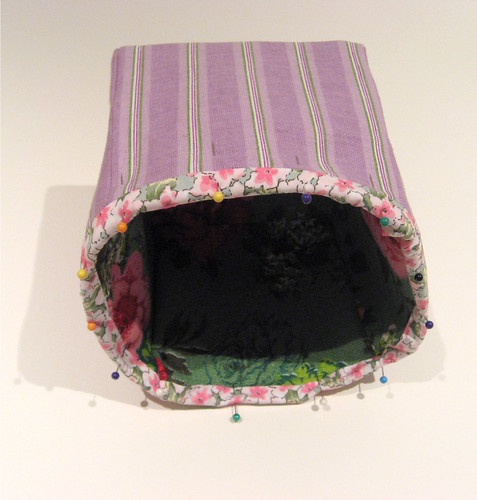
Fabric Box - Step 8
Fold your binding over into the inside of the box, pin it in place, and hand-stitch it down using a ladder stitch. And then you should have a pretty little fabric caddy for storing small odds and ends!
If you make a fabric box following this tutorial, I'd love to see it! Please add your pictures to my flickr group.
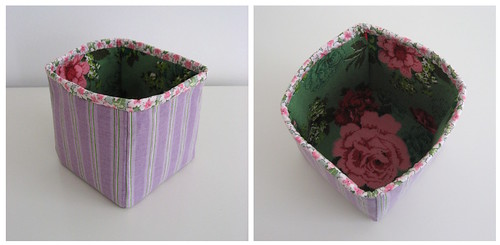
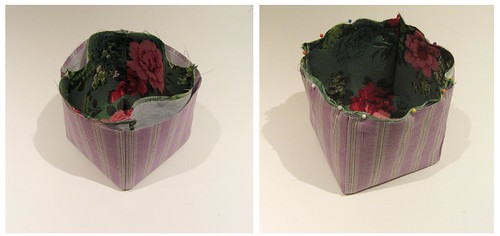
Finished Fabric Box
Photographs and artwork by Allison Gryski. © All rights reserved.
5 comments:
Awesome! And so easy to follow for a beginner like me!
Great tutorial, really helpful. Will try it this weekend. Thanks for sharing!
Such a terrific tutorial, just what I am after.
Nice tutorial. I want to make nice boxes for my daughter and your post will be very useful.
Thanks for the great tutorial! I've been looking to make fabric boxes for a doll armoire and your instructions were exactly how I thought it should work. Also, thanks for the link on how to make a ladder stitch, a new one for me.
Post a Comment