17 December 2010

Snow and Stars


Winter Wonderland


I woke up to a lovely winter fairyland this morning. By the time I was ready to run some errands, it was looking more like this ...


Snowy Day


That photo isn't out of focus -- there's just a white haze from all the big fluffy flakes falling. I was absolutely covered in melting white fluff by the time I got to the grocery store. (Apparently the snow is closing down public transportation ... seems so strange to my Canadian upbringing.) It is so pretty and Christmas-card-like out, though! It has also meant a brighter day, so I took some more pictures of my star garland and stitched them together so you can see the whole thing. (click here to view larger)


Complete Star Garland


In other yarn-related news, the other day I acquired my planned yarn basket when I went to the market. I love having something prettier and more functional that an assortment of plastic bags! Now I've just got to get on with beading my candy cane garland, so that it's ready for tree-decorating on the solstice.


Yarn Basket


Photographs and artwork by Allison Gryski. © All rights reserved.

16 December 2010

Star Garland Ta-dah!


60 stars


Sixty stars later and I'm finished my star garland! I was really hoping for some sunshine today so I could take a nice photo of it. Unfortunately it's all grey and rainy here. It also turned out to be tricky to fit it all in! So these will have to do...


Finished Garland


Finished Garland


If you'd like to make one of your own, I have a few notes on how I made my garland. I used 15 colours of yarn and for each colour, I did one large star with that as the outer colour. For more details on how I made the large stars, see my Colourful Crochet Stars Tutorial.

I also crocheted 3 small stars with each of the colours, for a grand total of 60 stars. Then I attached them to a chain in the following pattern (where s = small star, l = large star): s, l, s, s, s, l, s, s, s, l, ..., s, s, s, l, s
This will leave you with one small star leftover to turn into an ornament.


white star ornament


The way the stars seemed to be attached in the pattern, results in them having a tendency to hang sideways. I found that the little loop near the top of a point was perfect for adding a loop of yarn for the ornaments, but for connecting to the garland, I instead used a space a little lower.


Where to join a small star


Joining in a small star


To attach the large stars, I went under the chain stitches that form a point. I did 12 chain in between the small stars (as per the pattern), but that was too crowded around the large stars, so there's 15 chain on either side of those. I just did a slip stitch to attach the stars and then continued with the chain.


Joining in a large star


All other yarn and pattern notes are included on my star garland project on ravelry.

If you string a star garland following this tutorial, I'd love to see it! Post your pictures to my flickr group.


Photographs and artwork by Allison Gryski. © All rights reserved.

13 December 2010

Recipe: Gingerbread Cookies

At Christmas time, there are three types of cookies my family always has. Other treats come and go, but the cookies are a constant: gingerbread, shortbread, and cheesies. I am often asked for the recipes, so I thought I'd share them here. Today, I let you in on the secrets of my gingerbread cookies.


Gingerbread cookies


This recipe was the one my Grandfather used to make and the one my Mom always makes. Now it's become my gingerbread cookie recipe too. I grew up with gingerbread people and lots of different animal shapes. My tradition, when I bake them, is lots stars and hearts and ruffled circles with other tiny shapes cut out. I bought a set of super tiny cutters this year to have even more fun cutting out fancy shapes from the bigger cookies. There's a spice shop in the Albert Cuyp market that has tons of super fresh spices and other kitchen odds and ends. I found a little tin of 12 tiny cookie cutter shapes for just a few euros. Much fancy cookie fun was subsequently had!


Gingerbread batter


Grandfather's Gingerbread Men

(this is the doubled version, you can safely halve this recipe)

5 1/2 c white flour
1 Tbsp baking powder
1/2 tsp salt
2-3 tsp ginger
2-3 tsp cinnamon
1/2 tsp cloves
1 Tbsp unsweetened cocoa powder

1 1/3 c molasses
2/3 c sugar (technically not a "wet" ingredient, but it goes in with them)
1 c butter, melted
2 large eggs

Combine dry ingredients (while melted butter is cooling). Mix wet ingredients thoroughly, including egg at end. Combine all together and mix evenly to moisten.


Gingerbread batter resting


Chill in plastic bag 2 hours or overnight (allow several hours to warm up if in fridge overnight). Roll out and cut. Bake at 375° F for 10-12 minutes (or at 175° C for 8-10 minutes) on a floured (or parchment paper lined) cookie sheet.


Gingerbread dough


That's the basic recipe, but I'll let you in on the tricks I've learned from my Mom over the years.


Gingerbread dough with shapes


Secret tips
  • Let the eggs warm up to room temperature by whisking them up in a bowl and leaving to sit out.
  • Put the molasses in with the butter and melt slowly in the microwave. The molasses will be much easier to mix this way (but make sure you do it in increments, stirring in between so you don't scorch it). Let it cool a bit before mixing in with the eggs.
  • Make sure your flour isn't too densely packed. I estimate that I used about 840-860g. You can try leaving out half a cup until you see if it's coming together. If you add too much flour, it will be annoyingly crumbly and hard to pack into a ball or roll out.
  • Possibly the most important trick: don't chill the dough in the fridge unless you're not making the cookies until the next day. If it's too cold when you try to roll it out, it will go all crumbly and hard to work with. I just leave it to rest in a bag on the counter for a few hours.
  • Unless you have lots of counter space, only try to roll out half the dough at a time. Put the other half in the bag somewhere cooler since the dough will start to get really warm and too soft to handle once the oven is running.
  • These gingerbread cookies have the perfect blend of softness and crispiness. This does mean you shouldn't try to make a gingerbread house with them, which requires a completely crisp cookie.
Gingerbread cookies cooling
Happy Baking! Photographs and artwork by Allison Gryski. © All rights reserved.

09 December 2010

Colour!


Lovely Colours


Colour makes me absurdly happy. I love seeing colourful displays of art supplies. Picking out favourites and making arrangements of colours gives me a silly high. I guess it's being a visual person, but sometimes I think it's not normal how excited I get by stack of colourful yarn, fabric, or pencil crayons. (And then I read blogs by other yarn and fabric fanatics and know I'm not alone in my nuttiness).


Pots of Pencils


When I go into an art store, I love looking through the displays of pencil crayons. Pens and paints are also fun to choose, but it's the pencil crayons that always get me most giddy. At the yarn store I love seeing a wall full of luscious colours. Same thing at the fabric store. I'm especially keen on quilting stores where the goodies are arrayed by colour instead of type. Oh and buttons too, of course.


blue button square


Yup, organize a bunch of artsy crafty supplies by colour and I go a bit bananas. That visual stimulation is something I like in small doses in my home, so my current style favours a lot of plain white walls and furniture with my favourite colours introduced through textiles like quilts and cushions. Things I can have the fun of making!


Stacks of Fabric


I love arranging tidy stacks of fabric and pots of colour coordinated pencil crayons. But until recently, I never had too many colours of yarn before. My star garland project changed that and wow was it fun to sit by the shelf of yarn and pick out a rainbow of colours. It was hard to stop. It's been similarly hard to stop crocheting the stars as I keep getting to dip into my stash of yarn to pick out a new colour.


Rainbow Stars


Photographs and artwork by Allison Gryski. © All rights reserved.

07 December 2010

Tutorial: Colourful Crochet Stars

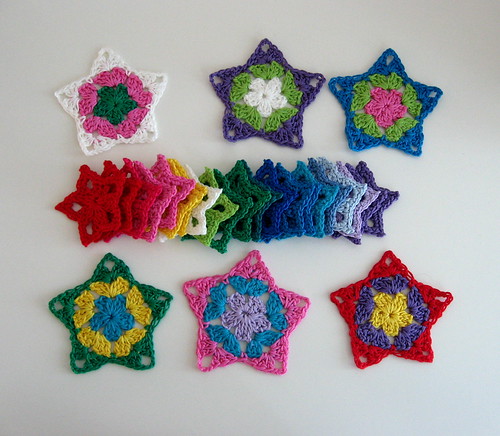
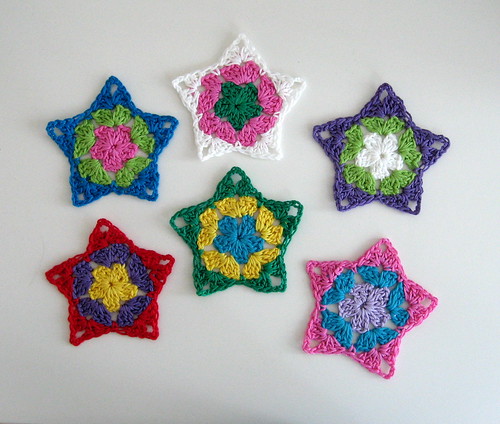
Colouful Crochet Stars


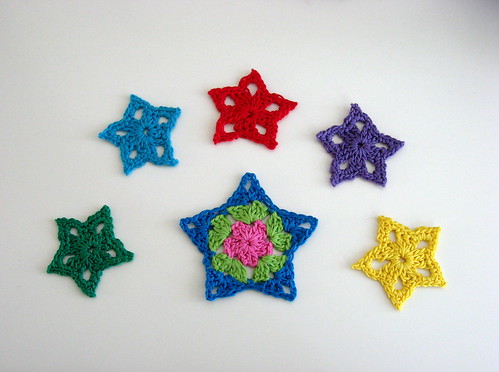
To make the large stars for my star garland, I have been using a slightly modified version of the Grandma Twinkle Stars. The lovely Michelle, who created that tutorial, has graciously given me permission to share my method for making them with 3 colours. I was inspired by the colourful star advent garland over at Attic24.

Techniques you'll need to know:
If you can crochet a granny square then you already know all the techniques you need to make these stars. If not, track down someone to show you because you can probably learn in less than half an hour!! You need to be able to do chain (ch), slip stitch (sl), single crochet (sc), and double crochet (dc). (I am using the American crochet terms, so if you're familiar with British notation, substitute double crochet and treble crochet for where I say single and double. These conversions will be shown in brackets).

My only other crochet project before this star garland was an afghan that was essentially one GIANT granny square. So I've tried to be really detailed for other beginners. There are surely other techniques out there for making these multi-coloured stars. This is what worked well for me.

How to Make Colourful Crochet Stars:

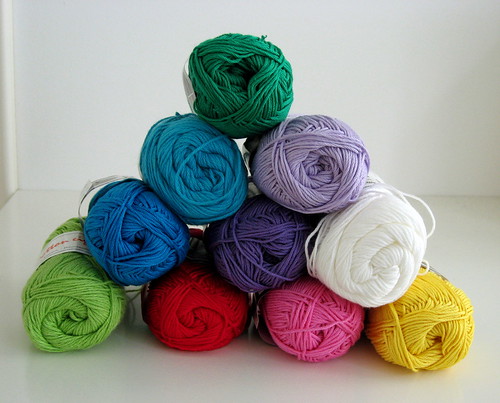
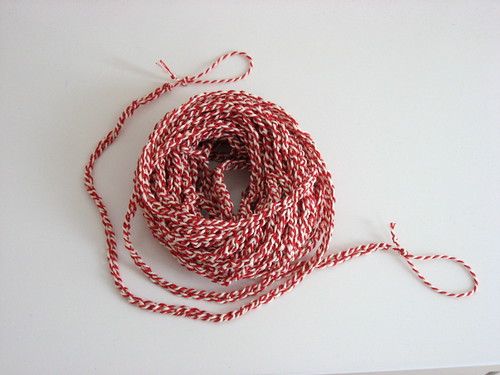
First, pick out 3 delicious colours of yarn to use, plus the hook size specified for your yarn. I'm using a mix of 4 ply and 5 ply cotton yarns, which specify to use a size 2.5mm or 3mm hook.

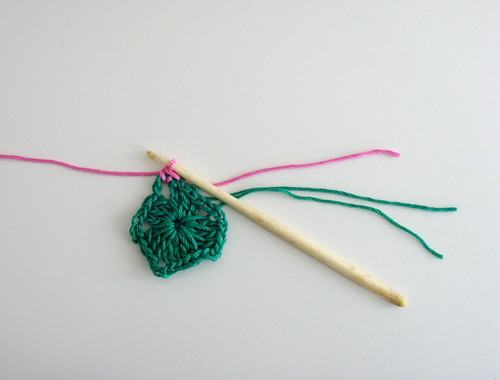
In your first colour:

Follow the original pattern for the first round.

Now, as per the pattern, you need to slip stitch through the tops of the two double crochet (treble crochet) stitches to get to the next gap. So still in your first colour, do the two slip stitches, but don't do the chain 3 yet. This is when you get out your next colour.

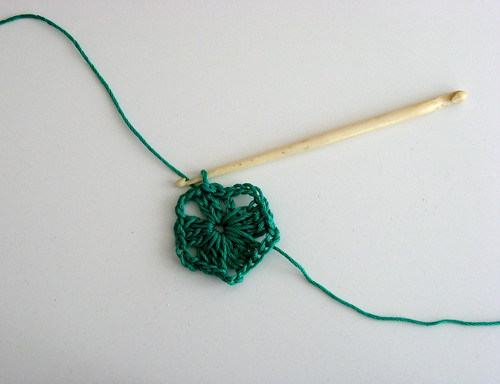
Just Before Colour Switch


In your second colour:

Hold the first colour plus a tail of your new colour out of the way, and hook through a loop of the new colour. Essentially you've just done a chain 1 using the new colour, to make the switch.
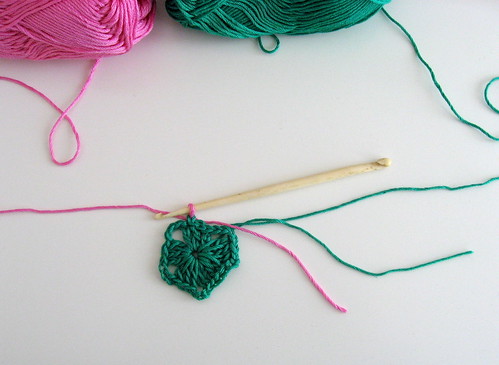
Colour Switch


Now do a single crochet (double crochet) in the gap with your new colour. You can now snip off the first colour, leaving enough of a tail for weaving in later.

After Colour Switch


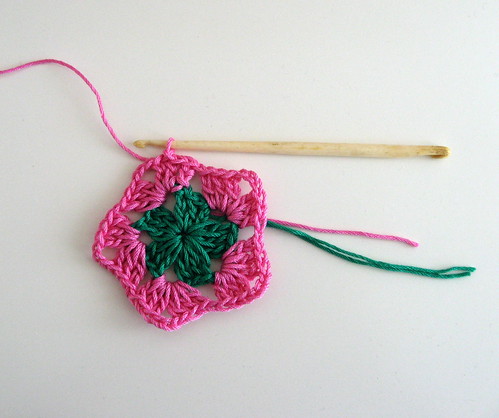
Continuing in your second colour, now do the chain 3 and continue with the original pattern for the rest of the second round.

After the end of this second round, you will do the same as before to switch colours.
So do two slip stitches to get to the next gap, then get out your next colour.

Just Before Next Colour Switch


In your third colour:

Just like before, hold the second colour plus a tail of your third colour out of the way, and hook through a loop of the new colour.
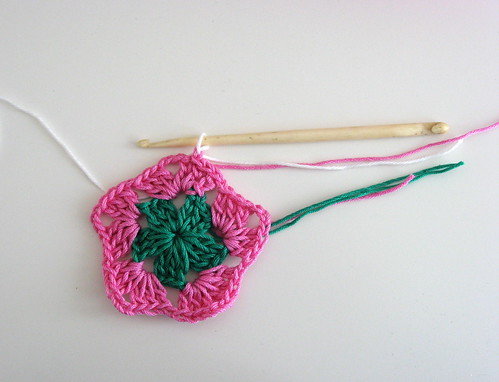
Colour Switch


Now do a single crochet (double crochet) in the gap with your new colour. You can now snip off the second colour, leaving enough of a tail for weaving in later.

After Colour Switch


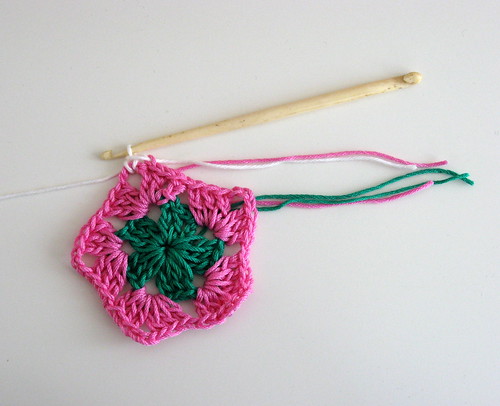
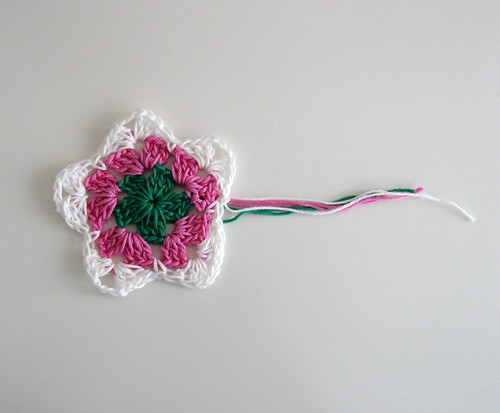
Continuing in your third colour, now do the chain 3 and continue with the the original pattern to finish your star.

The tedious part of these colourful stars is all the extra ends to weave in, but they're so cheery!

Finishing the Star


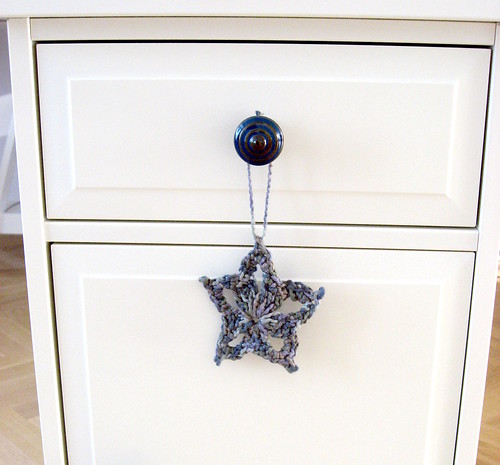
After completing a star, I smooth and stretch it out and squish the points to make them pointy instead of round. Then I press it into shape with a steam iron. Now see if you can resist making a stack more stars. I sure couldn't!

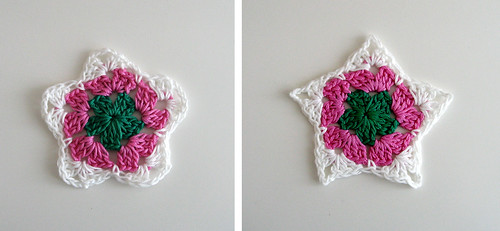
Before & After Pressing the Star


If you make some 3-colour stars following this tutorial, I'd love to see them! Post your pictures to my flickr group.

Photographs and artwork by Allison Gryski. © All rights reserved.

05 December 2010

Christmas Crafting

All that snowflake making has only made me more excited to make pretty things for Christmas. Part of it is that we left our xmas decorations packed up in Canada, so we don't have much here and I love Christmas time. It's also making me quite sentimental to think that things I make this year will become "forever" things for Bun that will always have been part of his/her Christmas.


Colourful yarn


For most of the year, I like a more restrained palette, but some of the fun of xmas is the garish, exuberant colours. My sweetie is fond of bright, fun colours, so I bought a selection of ten colours of cotton yarn (pink, red, yellow, light green, green, light blue, blue, light purple, purple, and white) when we picked up my new sewing machine (yay!).


Crochet Stars


I've started crocheting stars to make a garland, having been inspired by the cheerful, colourful style of one of my favourite blogs, Attic 24. My garland will have some stars like the ones in her advent garland and some small ones. For all the details, see my Star Garland project on ravelry.


Candy Cane Garland


I have also started a candy cane striped garland using some cotton twine that I saw in the kitchen supply store. I just crocheted a simple chain, and tied some loops in the ends. I have plans to add some beads to make it a bit sparkly. This one is destined to be a tree garland, whereas I think the stars will probably hang on our bookshelf.

I also made a little one-off star ornament when I was learning how to crochet the small stars. I always have to guess about hook size since all my crochet hooks are vintage ones made of bone. They're lovely to work with, but I have absolutely no idea on sizing.


Crochet Star Ornament


I now have such a stash of yarn and on-the-go projects that I plan to buy myself one of the cute (and cheap!) straw baskets that I've been admiring in the market for months. I've been pretty good here about not buying things without having a clear idea of a specific purpose for them. That's been one of the excellent and enduring lessons of our overseas-move-decluttering, so it's always nice when something I admired aesthetically suddenly has a functional purpose for me!


Photographs and artwork by Allison Gryski. © All rights reserved.

01 December 2010

Lacy Paper Snowflake Tutorial

More Snowflakes


Scroll to the end of the post for the giveaway winner!

For everyone who wants to make some lacy snowflakes themselves ... Start with my tutorial on how to make snowflakes with six points. The following tutorial explains my method for making the "lacy" or "stained glass window" style of snowflakes (and it assumes you already know the basics of snowflake making).

Materials:
  • A pair of sharp scissors with good points (I have some little red Singer sewing ones that I bought at a grocery store several years ago). If someone in your house likes to sew, do NOT steal their good sewing scissors as cutting paper will dull the blades.
  • Paper, one of three kinds: wrapping paper, old magazines, or printer paper. Avoid anything thicker than printer paper as it will be too bulky to cut nicely once it's folded.
    • Plain silver or gold wrapping paper is really pretty and since it's thinner than printer paper, it's easier to cut.
    • Magazines tend to be very thin and will rip easily if you're not careful. It's also slippery since it's glossy on both sides. However, it's essentially free, easy to cut when folded, and you can get a huge variety of colours from a single magazine.
    • White printer paper is cheap and plentiful in most households and it creates the classic white snowflake.
  • Optionally, you can use a protractor and/or pencil to help with folding precisely or even planning your pattern before cutting, but mostly I don't use either.

Size:
As for size, it's entirely up to you. I aim for slightly smaller ones -- usually I fit about 4 snowflakes to a sheet of A4 or letter-sized paper. If you make some larger ones, remember you can make tiny ones from the scraps.

The Snowflake Secrets
On to the tips! I've drawn on the paper in some cases to demonstrate the point, but I don't do this when actually making snowflakes. I tend to make it up as I go along.

1. Leave Less Paper
Most people make snowflakes that look something like the snowflake on the left (pretty, but a bit plain). But, it doesn't require an exacto knife or great skill to make a snowflake like the one on the right. The truth is that it's no harder, you just need to cut away MORE paper before unfolding! (I just folded the snowflake on the left back up and did exactly that to get the snowflake on the right).

Snowflake Types


Focus on the paper left behind more than the shapes you're cutting out, since once you unfold it, the paper will be the "positive" space and the shapes the "negative" space. To use the stained glass window metaphor, the paper will form the "leading" of the window.

If in doubt, keep cutting away until you only have thin lines of paper. Your snowflake may look quite boring when folded, but that all changes when you unfold it! (For the mathematical amongst you, the bit that you see when it's folded is 1/12th the final snowflake).

2. Use Simple Shapes
Start with cutting out only simple shapes. The easiest are triangles or wedges that require only two straight snips into the paper. You can still get a beautiful result just by cutting away most of the paper.

Cutting simple shapes


3. Use Large Shapes
Don't be afraid to cut out large shapes. It may be easier to cut a large piece out in several steps, especially if it's a complex shape.

Cutting out a large shape


4. Cut Methodically
Work your way from one end to the other (ie. top to point or vice versa), rather than randomly cutting stuff out. This makes it easier to ensure you don't have big bits of paper left in the middle.

Snowflake step-by-step


5. Pointy Snowflakes add Variation
To make a snowflake with decided points, remember that you will need to cut off most of one side of your wedge to achieve that effect.

Pointy Snowflake


6. Make Lots of Snowflakes
Practice is obviously always helpful. My first few are usually less successful than the ones I make later.

7. Display Together
My final tip is to always display your snowflakes in groupings. They invariably look more impressive together than individually.


Even More Snowflakes


I hope these tips help you make snowflakes you love. I've got a stack made to go on our tree. This year it will just be our potted ficus tree, rather than a proper "Christmas" tree. I will be waiting until the Winter Solstice to decorate it, as is tradition in my family. So exciting to think that there will be a little one next year, with whom to share these traditions and begin new ones.

If you make some snowflakes using this tutorial, I'd love to see them! Please add your pictures to my flickr group.

And the winner in my snowflake giveaway, chosen by the Random Number Gods is ... Angela #2! I also decided to pick a second winner ... the very first commenter on the post! Congratulations to both of you, I'll email you for your mailing addresses today!

Photographs and artwork by Allison Gryski. © All rights reserved.